Posts mit dem Label Colorationstechniken werden angezeigt. Alle Posts anzeigen

Bookpage Karte - bookpage card

Samstag, 13. Mai 2017

Hallo ihr Lieben!
***
Hi all!

Habt ihr Lust mal wieder eine neue Colorationstechnik zu versuchen? Heute habe ich (Bianca) zusammen mit unserem Designteam diese Anleitung für die Bookpage-Technik vorbereitet. Es existieren viele verschiedene Anleitungen zu diesem Thema im www. Diese hier ist die einfachste Variante und sie ist genau richtig, wenn ihr diese Technik noch nie probiert habt.
***
Are you in mood for trying a new coloration technique? Today the design team and I (Bianca) have preapared this little tutorial to show you how to do the bookpage-technique. There are so many tutorials for bookpage-technique in the www. This one is the most easy one, ideal if you never have try to color in boogpage technique before.


Diese Materialien braucht ihr dafür:
* alte Buchseiten (dazu später noch ein bisschen mehr!)
* Buntstifte, mindestens 2 Farbnuancen pro verwendeter Farbe + ein Weiß
* eventuell einen Buntstift Blender (klappt aber auch ohne!)
* eventuell Distress Stempelkissen
* Papier, Designpapier + Deko nach Wahl
* Stempelkissen, Schere + Kleber
***
This is what you need:
* old bookpage (I will write a little more info about this later)
* coloring pencils, 2 different shades of each color you want to use minimum
* eventually a colorpencil blender (but it works without, too!)
* eventually Distress stamp pads
* papers, pattern papers, deco
* stamp pad, glue, scissors


Beginnen müssen wir natürlich beim Bestempeln der Buchseite. An dieser Stelle noch ein paar Tipps dazu.

* Wenn ihr keine alte Buchseite habt, könnt ihr auch Zeitungspapier verwenden. Dazu einfach das Zeitungspapier erst auf ein weißes Stückchen Fotokarton kleben und gut trocken lassen. Beim colorieren müsst ihr dann aber darauf achten, dass ihr das Zeitungspapier nicht überstrapaziert. Sonst entsteht ein Loch.

* Wenn ihr ein altes Buch habt, aber dieses nicht zerschneiden möchtet, tut es auch eine gute Farbkopie einer alten Buchseite, so lange ihr einen Laser-Drucker und keinen Tintenstrahl-Drucker verwendet.

* Achtet darauf was auf der Buchseite geschrieben steht die ihr verwenden möchtet! Aus Erfahrung kann ich euch sagen, dass alle Beschenkten bei mir bisher immer versucht haben zu lesen was da drauf steht! Ideal ist ein Motiv das zum Inhalt der Buchseite passt.

***

Of course we have to start with stamping our image. But first here are some useful hints.


* If you don't have an old bookpage you can use newspaper, too. You have to stick it on a sheet of paper before you can start. If you color on it you have to be very careful not to damage the paper.

* If you have an old book but you don´t want to cut it you can use a good colorcopy of it, too. Take care you copy with a laser printer as this ink will be fade resist if you color it.

* Take care about the text on your bookpage. In the past I noticed that every receiver of a bookpage technique project tried to read the text. It´s ideal if you find a fitting text for your image.

So, dann fangen wir mal an:
***
So let´s start:

Mit einem normalen Stempelkissen stempelt ihr euer Motiv auf die Buchseite drauf. Je nach dem welche Beschaffenheit euer Papier hat kann es sein, dass ihr dafür etwas mehr Stempelfarbe braucht als ihr es gewohnt seid. weil das Papier rauer ist.
***
Stamp your image with a normal stamp pad. Don´t forget it´s not stamping paper you are using. So maybe you will need a little more ink as usual.

Dann beginnt mit der Coloration. Es wird immer zuerst die helle der beiden Farben aufgetragen und dann mit der dunklen Schatten coloriert. Ich habe die beiden Farben dann noch mit einem Blender bearbeitet. Wenn ihr keinen Blender habt macht das aber auch nichts, ihr könnt statt dessen auch mit der helleren der beiden Farben die Übergänge zu den dunklen Teilen übermalen und so vermischen.
***
Start to color your image. You always have to use the light shade of your color first and than you can create shadows with the dark shade. You can blend the colors with a blender. If you don't have one you also use the light shade of your color again and color once more the areals between the light and the dark shade. It will look nearly the same as if you use a blender.

Mit weiß erzielt man schöne Kontraste. Wenn ihr möchtet könnt ihr auch Teile des Motivs ohne Coloration lassen. Jetzt sind wir schon fertig mit dem Colorieren des Motivs. Um es etwas hervor zu heben könnt ihr jetzt noch mit einem hellen Grau einen Schatten um das Motiv herum machen.
***
With a white color pencil you can create pretty accents in your image. If you like you can also leave parts of your image without coloration. If you have finished your coloration you can create a light grey shadow around it. That way it will turn out better.

Am Schluss könnt ihr noch die Ränder des Motivs etwas mit der Distress Ink Farbe bearbeiten. Dass hebt euer Motiv noch etwas hervor und verstärkt den "altes Buch" Effekt noch zusätzlich. Jetzt kann das Motiv zum Einsatz kommen.
***
You can distress the edges of your creation with distress ink. It will push the "old book" look. Now you can use your image in bookpage technique.


Hier seht ihr noch die tollen Werke unserer Designer:
***
These are the projects of our team:


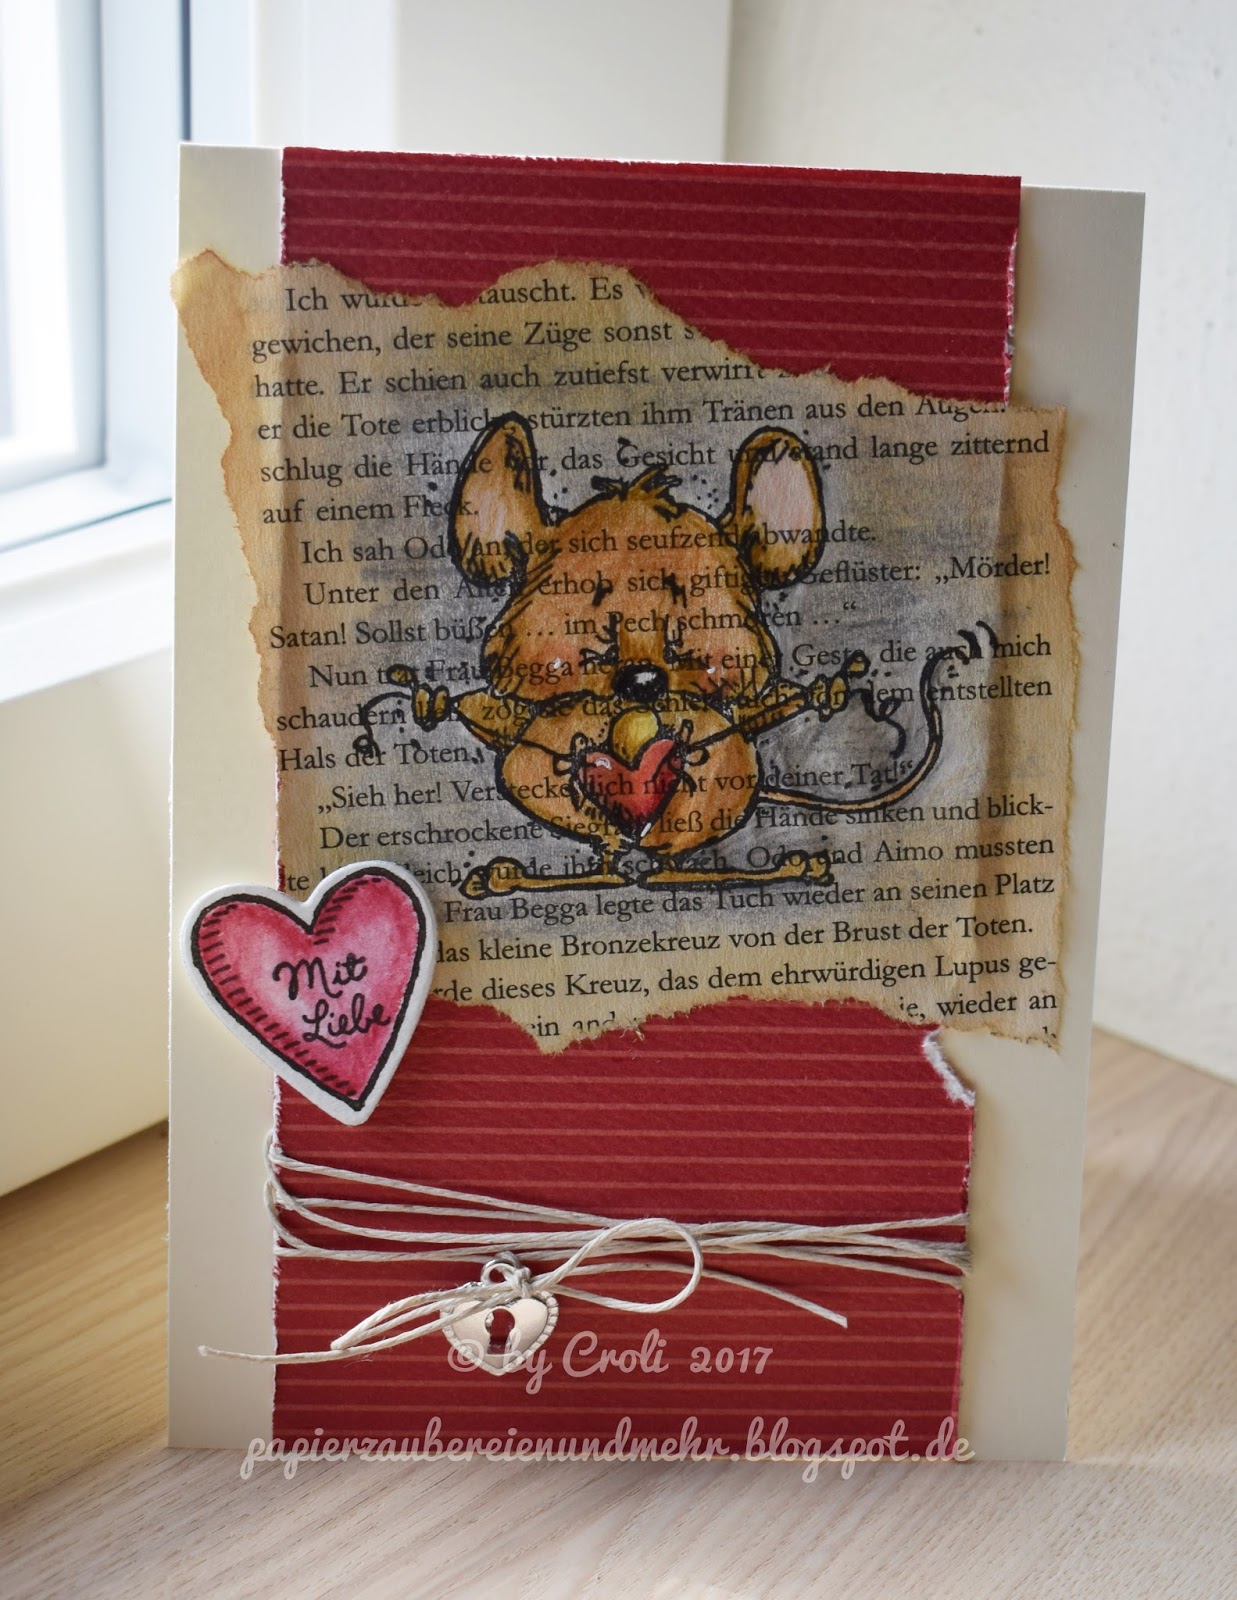




Read more...

Keine-Linien-Technik/ no-black-lines-technique

Samstag, 10. März 2012

Hallo ihr Lieben, endlich ist es wieder Samstag und Zeit für eine neue Ausgabe vom Stempeleinmaleins. Heute zeige ich euch die "Keine-Linien-Technik". Hierbei handelt es sich um die Colorationstechnik, bei der man keine Konturen sieht.
***
Hi friends, finally it is Saturday which means time for another issue of Stempeleinmaleins. Today I want to show you the no-black-lines-technique. This coloring technique is the one where you don't see any outlines.


Ihr braucht:
- ein sehr helles Stempelkissen
- ein schwarzes wasserfestes Stempelkissen für die Augen und Augenbrauen
- Papier
- Stempel
***
You need:
- a very light stamp pad
- a black waterproof stamp pad for the eyes and eyebrows
- paper
- stamp

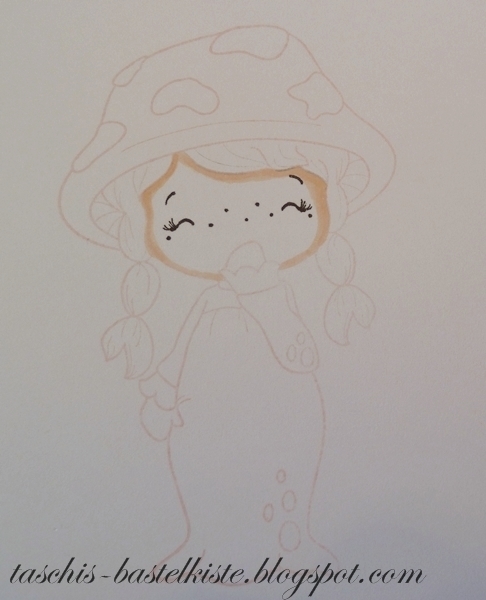
Ich habe ein hellrosanes Stempelkissen benutzt. Nur auf die Augen und Augenbrauen habe ich vorsichtig schwarze wasserfeste Stempelfarbe aufgetragen. Ihr könnt die Augen und Augenbrauen alternativ nach dem Colorieren mit der Hand zeichnen. So sieht mein Motiv dann gestempelt aus. Ich habe das Motiv noch einmal in schwarz auf ein einfaches Stück Papier gestempelt, um mich beim Colorieren daran zu orientieren.
***
I used a light pink stamp pad. I only put carefully black waterproof stamping ink on the eyes and eyebrows. You can also handdraw the eyes and eyebrows after colouring. This is how my stamped image looks like. I also stamped the image in black on a piece of paper to be orientated towards it.

Ich fange immer als erstes mit dem Gesicht an. Ich habe E00 auf die Stellen aufgetragen, die am dunkelsten sein sollen.
***
I always do the face first. I used E00 for the ares I want to be the darkest.

Danach habe ich E000 benutzt und bin damit über die vorher colorierte Fläche von E00 gegangen.
***
I went on with E000 and coloured the areas that I coloured with E00 before.

Die nächste Farbe ist E0000. Die Wangen habe ich mit R20 gemacht. Ich habe anschließend nochmal E000 und E0000 benutzt, um alles zu vermischen.
***
Next colour is E0000. For the cheeks I used R20. Then I used E0000 and E000 again to blend the colours together.

Als nächstes habe ich die Haare coloriert. Ich beginne auch bei den Haaren immer mit der dunkelsten Farbe, hier habe ich E43 genommen.
***
Next I coloured the hair. I always start with the darkest colour, here I used E43.

Danach habe ich E42 benutzt und bin damit über die vorher colorierte Fläche von E43 gegangen.
***
I went on with E42 and coloured the areas that I coloured with E43 before.

Die nächste Farbe ist E41. Anschließend habe ich wieder alles mit der mittleren und hellsten Farbe vermischt.
***
Next colour is E41. Then I used the middle and lightest tone again to blend the colours together.

Für den Hut und das Kleid habe ich mir ein Rot ausgesucht. Ich habe mit dem dunkelsten Ton angefangen, R22.
***
For the hat and the dress I chose a red tone. I started with the darkest colour, R22.

Danach habe ich R21 benutzt und bin damit über die vorher colorierte Fläche von R22 gegangen.
***
I went on with R21 and coloured the areas that I coloured with R22 before.

Die nächste Farbe ist R20. Danach habe ich wieder alles mit der mittleren und hellsten Farbe vermischt.
***
Next colour is R20. After that I blended all together with the middle and lightest tones

Zuletzt habe ich mit einem weißen Gelstift Punkte auf die Wangen gesetzt und die Flecken auf dem Hut und Kleid mit Glossy Accents versehen.
***
Finally I added some dots with a white pen on the cheeks and added Glossy Accents to the spots on the hat and the dress.

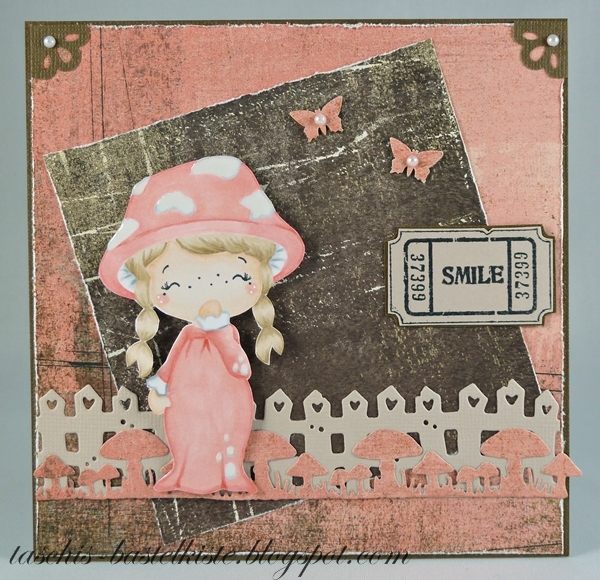
So sieht meine Karte aus, die mit dem süßen Motiv enstanden ist. Ich hoffe, dass ihr auch Lust habt diese Technik mal auszuprobieren.
***
And this is my finished card I made using this cute image. I hope you will be up for trying this technique.

Liebe Grüße/ Hugs, Natascha

Und das sind die Karten vom Team:
***
These are the cards from the team:
 
Heike (gestempelt in grau)


Jay Jay (Aquarellstifte)


Kathrin (Copics)


Read more...

Copics/Promarker und Polychromos/Prismas

Samstag, 16. Oktober 2010

Es ist wieder Samstag und wir haben natürlich eine neue Ausgabe vom Stempeleinmaleins für euch. Heute ist die liebe Jacqui Dennis von Cats Whiskers aus England unser Gast und zeigt uns wie man mit Copics/ Promarkern in Kombination mit Polychromos/Prismacolor Stiften + Terpentinersatz coloriert.
***
It's Saturday again and we are back with a new issue of Stempeleinmaleins for you. Today the lovely Jacqui Dennis from Cats Whiskers (UK) is our guest and telling us how to color with Copics/Promarkers in combination with Polychromo/Primascolor pencils + white spirit.
014
ES GIBT EINE REGEL, WENN IHR ZWEI MEDIEN MITEINANDER KOMBINIERT - NUTZT DIE BUNTSTIFTE FÜR DIE SCHATTENSETZUNG ERST NACHDEM IHR DAS MOTIV MIT COPICS COLORIERT HABT, ANDERNFALLS KÖNNT IHR EUCH DIE MARKER RUINIEREN, WENN IHR MIT DER SPITZE MIT DER FARBE DER STIFTE BZW. DEM TERPENTINERSATZ IN BERÜHRUNG KOMMT.
***
THERE IS ONE RULE WHEN COMBINING THE TWO MEDIUMS – THE PENCILS MUST BE USED AFTER YOU HAVE DONE ALL YOUR COLOURING WITH THE COPICS, IT WILL COMPLETELY RUIN YOUR MARKERS IF THE NIBS COME INTO CONTACT WITH THE PENCILS OR THE SANSODOR.

001
002
003
Wenn ihr James den Bären von Lili of the Valley oder ein anderes niedliches Motiv coloriert, startet mit Copic E53 und malt die Farbe, wie in Bild 1 zu sehen, zuerst unter den Fellrand und an die Seite des Kopfes. Im zweiten Schritt malt ihr mit E51 weiter und blendet (verwischt) die Fläche, die ihr vorher mit E53 bemalt habt. Im dritten Schritt nehmt ihr E50 und vermalt die gesamte Fläche. Natürlich funktioniert das auch mit Promarkern.
***

To start colouring James the bear from Lili of the Valley or other cute images apply Copic E53 around the hate and side of face as shown in picture 1, then add E51 to bring the colour further out into the face making sure you also blend in E53 picture 2, finally using E50 go over the whole face blending in the 2 previous colours – picture 3. Of course this is also working with Promarker.

004
005
006
Coloriert auch den Rest des Fells nach dem oben genannten Prinzip.
***
Using the same colours and method colour the rest of the fur as below.

007
008
009
Für die Mütze und die Geschenke nehmt ihr R08 und malt die Farbe um die Ränder der Geschenke und James Mütze (Foto 1). Nun vermalt ihr mit der gleichen Methode wie schon zuvor die Farben, erst mit R02 (Bild 2) und dann mit R000 (Bild 3).
***
Now for the Hat and Presents using R08 colour around the edges of the present and James Hat – picture 1,  using the same method as for the fur now add R02 – picture 2, and finally add R000 – picture 3.

010
011
012
Zum Schluss müsst ihr noch die restlichen Geschenke, den Fuß und das Ohr colorieren. Für die restlichen Geschenke/Schleifenbänder nehmt ihr zuerst BG13, für den Fuß und das Ohr R02 (Bild 1). Vermalt sind die Flächen danach mit BG11 (Geschenke) und R000 (Füße und Ohr), wie ihr dem zweiten Bild entnehmen könnt. Das letzte zum vermalen verwendete Blau ist BG10. Nun habt ihr die Markercoloration abgeschlossen und es geht an den letzten Schliff.
***
The last step is adding the final colour to the present and his foot and ear. BG13 has been used for the first step in colouring the blue present & ribbon, and R02 for the foot and ears – picture 1, the next blue to be added is BG11 & R000 is added to the rest of the foot and ears – picture 2.  The last blue is BG10.  You have now finished colouring James with the Copics and we will go on to the final step.

013
015
018

Jetzt werden die Schatten mit den Buntstiften gesetzt. Ich habe die Linien extra etwas dicker aufgetragen, damit ihr sie in der Anleitung besser sehen könnt. Malt eine dünne Linie mit einem SCHWARZEN Polychromo oder Prismacolor Stift auf die roten Flächen (Mütze und Geschenke), wie in Bild 1 zu sehen. Jetzt dippt ihr euren Papierwischer in den Terpentinersatz und vermalt den schwarzen Schatten in kreisenden Bewegungen damit (die Farbe ins Motiv ziehen). Für den Schatten des Fells nehmt ihr einen dunkelbraunen Stift und setzt eure Schatten damit (Bild 2) und vermalt diese danach wieder mit einem getränkten Papierwischer (Bild 3).
***
Now to add the deep shadows with the Pencils. The lines of pencil are a bit thicker than I would usually make them but this is try to make them easier for you to see. Add a thin line of BLACK Polychromo or Prismacolor pencil around the edges of the red hat and present – picture 1, then dipping the end of your stump into the sansodor, use the wet stump and small circular motions move the pencil out into the image – picture 2, then add dark brown pencil around the edges of fur picture 2, to complete blend out the brown as before – picture 3.

020
Hier seht ihr das Motiv fertig coloriert.
***
Here is the image with all the steps completed.

021Und hier ist die  fertige Karte gemacht aus Bo-Bunny Papieren, Martha Stewart Schneeflocken und mit Glamour Dust beglitzert.
***
The final card has been made with Bo-Bunny Papers and Snowflakes punched with Martha Stewart Snowflakes Punches and glittered with Glamour Dust.

Hugs Jacqui xx

Hier sind noch einige weitere wunderschöne Beispielkarten:
***
Here are some more beautiful sample cards:


Read more...

  © Blogger template Writer's Blog by Ourblogtemplates.com 2008

Back to TOP