Schon wieder ist eine Woche vorbei, es ist Samstag und Zeit für eine neue Ausgabe vom Stempeleinmaleins. Ich habe schon ein paarmal eine Guckloch-Karte gebastelt und möchte Euch heute zeigen, wie ich`s gemacht habe.
***
Again the week`s flown by, it is Saturday and time for another issue of Stempeleinmaleins. I already made some of these peep-hole-cards, and today I want to show you how I made them.
Das benötigt Ihr:
Schneidemaschine/Cuttermesser, Spellbinders Nestabilities in drei Größen, Cuttlebug o. ä., Bleistift, Tesafilm, doppelseitiges Klebeband, Deko für die Karte nach Wunsch
Cardstock: 15x30 cm für den Kartenrohling, 14,5x14,5 cm (3x) zum Matten, evtl. passende Reste zum Ausgestalten (Stanzteile etc.) - je nach Lust und Laune alle Kanten distressen
Design Papier: 14 x 14 cm (3x) zum Matten, evtl. passende Reste zum Ausgestalten (Stanzteile etc.) - je nach Lust und Laune alle Kanten distressen
***
That`s what you need:
Cutting tool/knife, Spellbinders Nestabilitis in three coordinating sizes, Cuttlebug, pencil, sello tape, doublesides adhesive tape, embellishments
Cardstock: 6 x 12" for the card base, 7,25x 7,25" (3x) for layering,optional: leftovers for decorating (punchouts etc.) - distress all the edges if you like
Design paper: 5,6 x 5,6" (3x) for layering, optional: leftovers for decorating (punchouts etc.)
- distress all the edges if you like
So hab ich`s gemacht:
Ich schneide ein Stück Cardstock zu mit den Maßen 15 x 30 cm und falze es bei 15 cm in der Mitte, dies ist mein Kartenrohling.
***
How I did it:
I cut a piece of cardstock measuring 6 x 12 " and fold it at 6". This is my card base.
Mein coloriertes Stempelmotiv stanze ich mit der größten der drei Spellbinders Stanzformen aus und überlege mir, an welcher Stelle ich es später auf der Innenseite platzieren möchte.
***
Using the biggest of the three Spellbinders I punch out my stamped image and decide where to place it lateron at the inner side of my card.
Gefällt mir die Platzierung lege ich - auf der der Vorderseite der Karte - die kleinste der Stanzformen darüber und suche mir den Ausschnitt aus, der später durch das Fenster der Vorderseite zu sehen sein soll. Ich ziehe das Motiv unter der Schablone weg und fixiere diese mit etwas Tesafilm, damit sie mir beim Ausstanzen nicht verrutscht, und stanze die Öffnung aus der Vorderseite aus.
***
If I´m satisfied, I put the smallest one of the dies on top of the image (at the front part of the card) and choose the section which is going to be seen through the window of thefinished card. After pulling the image away from beneath it I fix the die with some sello tape and punch out the aperture at the front part of the card.
Auf die lila Grundkarte will ich jetzt eine Lage schwarzen Cardstock und darauf eine Lage Design Papier aufbringen. Diese müssen natürlich auch Fenster bekommen, die aber nicht gleich groß ausgestanzt werden sollen, sondern jeweils ein bisschen größer, um einen schön abgestuften Effekt zu erzielen.
Dazu fixiere ich den schwarzen Cardstock auf der Vorderseite provisorisch so, wie er später sein soll, drehe die Karte um und markiere mit Bleistift den Ausschnitt des Fensters.
***
I´m going to put a layer of black cardstock and design paper to my lilac card base, of course these have to get some windows as well. I just don`t want them all the same size, but each a bit bigger, to achieve a nice layered effect.
I therefore affix the black cardstock temporarily to the front part, turn the card around and trace the aperture with a pencil.
Den Cardstock nehme ich nun wieder ab, lege möglichst mittig die nächstgrößere Stanzform über die Öffnung und zeichne (hier mit weißem Stift) die Innenlinie der Stanzform ab. Diese wird nun mit dem Cuttermesser oder Schere ausgeschnitten.
***
After releasing the cardstock from the base, I center the die with the next bigger size on top of the aperture, and trace (here with a white pencil) the inner line of the die. I cut it out with a knife or scissors.
Das Design Papier befestige ich nun auch provisorisch auf dem schwarzen Cardstock, drehe alles um und markiere den Ausschnitt mit Bleistift. Dieselbe Stanzform wie eben klebe ich mittig über die weiße Markierung, fixiere sie mit Tesafilm und stanze die Öffnung aus.
- Für die linke Innenseite der Karte führt Ihr diese Schritte nun entsprechend aus. -
Jetzt sollten Eure Papiere in etwa so aussehen und können, gut übereinander passend zusammengeklebt werden.
***
Next I affix the design paper - again temporarily - to the black cardstock, and turning it all around trace the aperture with a pen. I center the same die as before on top of the white mark, fix it with sello tape and punch it out.
- Do the same steps for the left inner part of the card accordingly. -
Now your layers should look like this and can be glued together, hopefully fitting well.
Wenn Ihr auch ein kleines Charm in der Öffnung baumeln lassen wollt, ist jetzt - vor dem Zusammenkleben - der richtige Zeitpunkt, um es einzufügen.
***
If you`d like a little charm dangling in the window, now - before glueing all layers together - would be the right moment to insert it.
Die rechte Innenseite der Karte erhält natürlich keine Ausstanzung mehr. Hier habe ich nur eine Lage schwarzen Cardstock und Design Papier aufgeklebt.
Eure Karte ist jetzt im Rohbau fertig und sollte in etwa so aussehen:
***
The right inner side of your card of course needs no cuttings. I only attached a layer of black cardstock and design paper.
Your card is now basically finished and should look like this:
 |
| Vorderseite / Front part |
|
|
|
|
 |
| linke Innenseite / left inner part |
|
|
|
 |
| rechte Innenseite / right inner part |
|
|
|
|
Nun kommt der schönste Teil, das Ausgestalten der Karte.
Das vorbereitete Stempelmotiv klebt Ihr auf die rechte Innenseite, so dass es schön durch das Fenster hindurch zu sehen ist.
***
Now you can start with the nice part of decorating your card.
The prepared stamped image will be fixed to the right inner side, so that it can be seen through the window.
Beim weiteren Ausschmücken sind Eurer Phantasie keine Grenzen gesetzt und ihr könnt Euch nach Belieben austoben! Nur innen in der Karte sollte der Schmuck nicht zu dick ausfallen, damit man sie noch schließen kann.
***
The sky`s the limit in further decorating your card. You should only see to it that you don`t put too bulky things inside, otherwise it wouldn`t close properly anymore.
Ich hoffe, Ihr hattet Spaß an meinem kleinen Workshop und Lust bekommen, eine "Guckloch"-Karte auch einmal nachzuarbeiten.
***
I hope you like my little tutorial. Now it`s your turn to try and to work on a peep-hole-card. Enjoy!
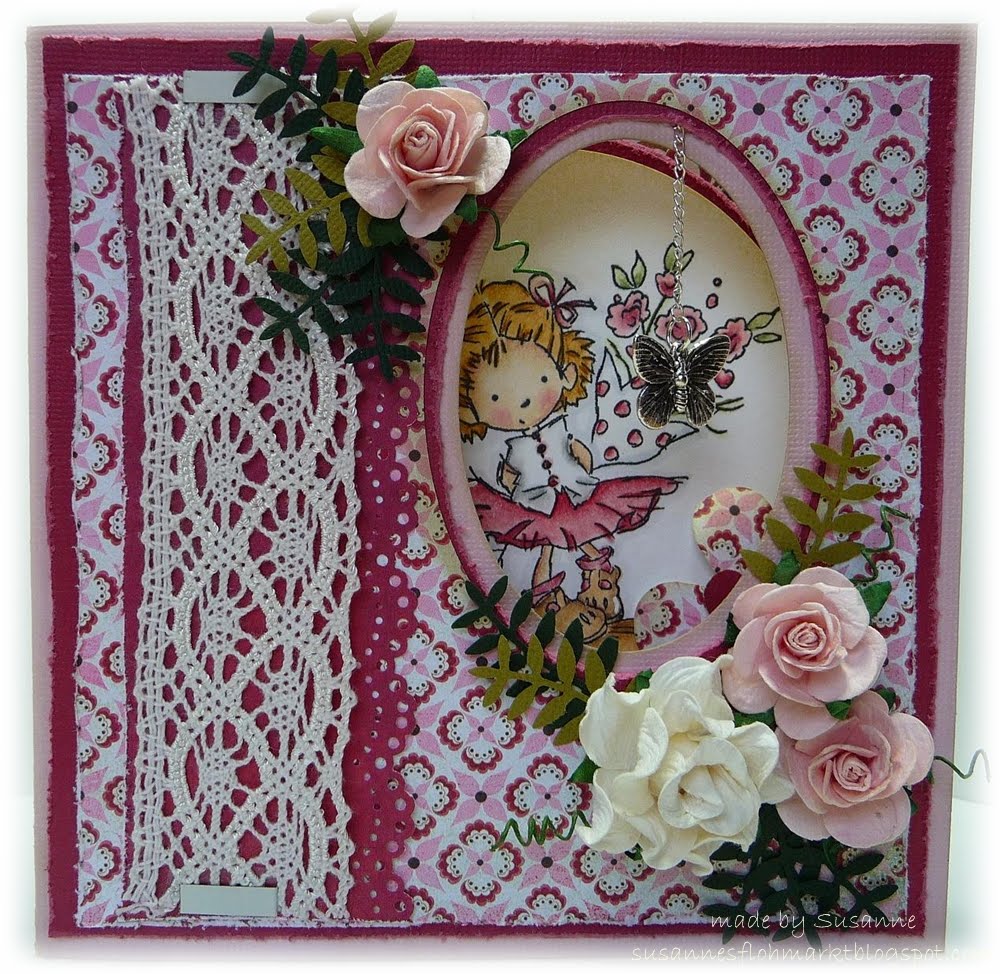
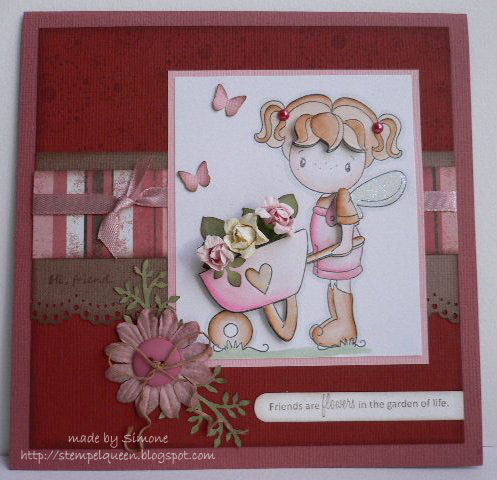
Hier sind noch ein paar Beispiele:
***
Here`s some more inspiration:
 |
Lili of the valley - Rosi
|
 |
Hänglar-Mädel mit Strickkorb
|
Viel Spaß!
***
Have fun!
Susanne
Read more...


 Habt ihr schon gesehen, dass wir mittlerweile auch einen Challenge Button zum Mitnehmen haben? Wer mag, darf ihn sich gerne auf seinen Blog stellen und zum SEME bzw. der monatlichen SEME Challenge verlinken.
 Dieses Mal verlosen wir einen 10 Euro Gutschein für Betty's Creations unter allen Teilnehmern der achten SEME Challenge, den uns die liebe Betty lieberweise zur Verfügung gestellt hat. Seit heute sind hier übrigens neue Weihnachtsmotive erhältlich!
 Ihr dürft den Sketch nach euren Vorstellungen abändern, aber man muss erkennen können, dass er die Grundlage für eure Karte war. Wenn eure Karten fertig sind, dann stellt ihr sie auf eurem Blog ein (wir würden uns freuen, wenn ihr in eurem Posting auch den Stempeleinmaleinsblog verlinken würdet) und schreibt einen Kommentar unter diesem Posting. In diesen Kommentar setzt ihr einen Link, der direkt zu eurem SEME Challenge Posting führt, damit jeder eure Karte sofort findet. Hierzu benötigt ihr den folgenden HTML Code, den ihr einfach abtippen und abwandeln könnt. Dann erscheint in eurem Kommentar nur ein Wort (Name)/Link zu eurem Posting.
 An der Verlosung teilnehmen könnt ihr bis zum 25.09.2010!


