Willkommen im Wochenende :) Heute haben wir eine Karte für Euch, die eine zweite Mitteilung oder auch ein weiteres Motiv versteckt.
***
Welcome to the weekend :) Today we have a card for you with a hidden message or a hidden image.
Für eine Karte in der Größe 10,5 cm x 14,5 cm benötigt Ihr folgende Cardstock-Teile:
1x 10,5 cm x 21,5 cm (Vorderteil) - falzen bei 7 cm
1x 10,5 cm x 22,5 cm (Mittelteil) - in der Mitte falzen
1x 10,5 cm x 14,5 cm (Rückseite)
Ich habe die Teile zur Veranschaulichung in unterschiedlichen Farben geschnitten, so kann man das Prinzip der Karte besser sehen.
***
For a card with the measures 10,5 cm x 14,5 cm you'll need these pieces of cardstock:
1x 10,5 cm x 21,5 cm (front) - fold at 7 cm
1x 10,5 cm x 22,5 cm (middle) - fold in the middle
1x 10,5 cm x 14,5 cm (back)
I used different colours of cardstock, so you're able to see how it works.
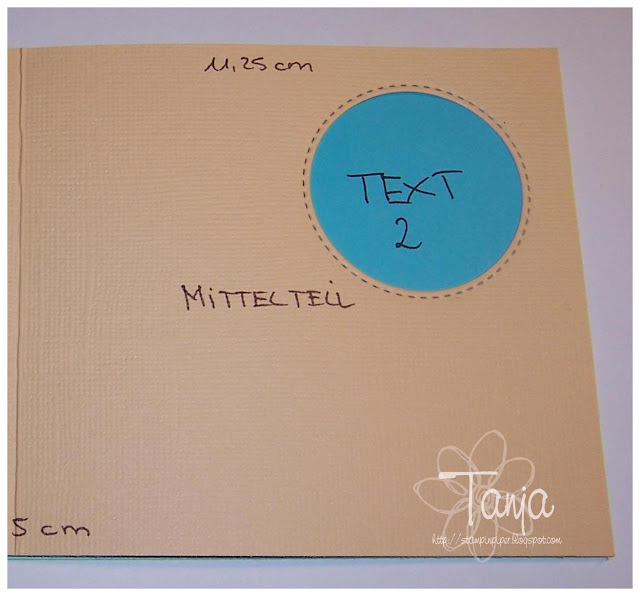
Das Vorderteil und das Mittelteil werden mit Fenstern versehen. Hierzu nehmt das gefaltete Mittelteil und legt es am Vorderteil an und stanzt durch 3 Blätter durch (mit der Stanzmaschine oder auch einer Handstanze). Wenn das zu dick ist, müsst Ihr in mehreren Schritten stanzen. Aussehen sollten Eure Teile dann wie oben auf dem Bild. Achtet darauf, dass das Fenster nicht zu groß ist, da sonst der schmalere Teil des Vorderteils in das Fenster ragt.
***
The front part and the middle part are provided with windows. To
do this, take the folded center piece and attach it to the front piece
and punch through 3 sheets (with your die-cutting machine or a hand punch). If that's too thick, you'll have to punch in several steps. Your parts should look like shown in the picture. Make sure that the window is not too big, otherwise the narrower part of the front part will protrude into the window.

Die eine Hälfte des Mittelteils wird nun exakt auf die Rückseite des Vorderteils aufgeklebt.
***
One half of the middle part is now glued exactly on the back of the front part.
So sollte es nun bei Euch aussehen. Ich habe die Fotos leider falsch herum gemacht ...
***
That's what it should look like with you. Unfortunately, I took the pictures the wrong way around ...
Der versteckte Text befindet sich auf dem kleineren Teil des Vorderteils. Ihr müsst Euch hier an dem gestanzten Fenster orientieren. Am besten stempelt Ihr durch das Fenster durch, wenn die Karte aufgeklappt ist.
***
The hidden text is located on the smaller part of the front part. You have to orient yourself here by the punched window. The best way to stamp through the window, when the card is opened.
Um Euer Motiv oder den Text, den man vorn auf der Karte sehen soll, zu platzieren, legt Ihr den vorderen Kartenteil auf die Rückseite und markiert die Stelle oder stempelt direkt dorthin. Auf der Rückseite bringt Ihr Kleber wie auf dem Foto zu sehen an und klebt den vorderen Teil fest.
***
To place your
design or the text you want to see on the front of the card, place the
front part of the card on the back and mark the spot or stamp there. Add some adhesive on the back piece of cardstock as shown in the picture and stick the front part firmly.
Wenn Ihr die Karte nun aufklappt, verschwindet langsam der "Text 1" und "Text 2" schiebt sich davor.
***
When you open the card, the "Text 1" disappears slowly and "Text 2" moves in front of it.
Der hintere Teil der Karte wird nicht weiter festgeklebt, da der Schiebemechanismus sonst nicht funktioniert.
***
The back of the card will not be glued, because otherwise the sliding mechanism will not work.
Ich habe eine Karte zum 40. Geburtstag meines Bruders gemacht, leider kann man das Embosste auf den Fotos nicht so gut einfangen ...
***
I have made a card for my brother's 40th birthday, unfortunately you can not capture the embossing on the pictures so well ...
Und das sind die Karten vom Team:
***
Here are the cards from the team:


6 Kommentare:
Śliczne prace DT ! Bardzo lubię taką formę kartki :-)
great tutorial and so nice cards!
hugs
Hoi Tanja, wat een leuke voorbeelden zijn er door jou en je team gemaakt :)
ik ga een poging wagen om je idee over te nemen, bedankt voor de uitleg:)
ik ben gelijk volger van je blog geworden :)
groetjes Sjeeny
Hört sich ziemlich schwierig an. Werde es dennoch versuchen, weil man während des Basteln die Dinge besser versteht.
Auf jeden Fall vielen Dank für diese ausgefallene Idee und die Anleitung dazu.
LG Marie
Wow... eine tolle Anleitung und tolle Musterkarten!
Die werde ich mir merken und bald liften.
Danke!
GLG Ines♥
Es gibt gerade sehr billige Schiebekartenstanzen für 2,50€ bei Nellie - ähnliche Idee und sehr pfiffig von Dir gelöst.
Gruß von Annelotte
Kommentar veröffentlichen