


SEME Challenge #80 - Neue Errungenschaften
Samstag, 24. September 2016
Dieser Post enthält Werbung für ScrapbookHeaven.
Da sind wir wieder mit einer neuen Stempeleinmaleins Challenge. Vielen Dank an alle Teilnehmer unserer 79. Challenge. Wir freuen uns sehr, dass ihr mitgemacht habt!
Bevor wir mit der neuen Challenge starten, möchtet ihr bestimmt wissen wer die Gewinnerin der letzten Challenge und somit des 10,00 Euro Gutscheins von Betty's Creations ist. Wir gratulieren Lairdess Svenja ganz herzlich! Bitte schicke uns eine E-Mail mit deiner Adresse.

Das Thema unserer 80. Challenge lautet "Neue Errungenschaften". Ihr sollt also eure neusten Stempel und/oder Stanzen verwenden!
Euer fertiges Werk stellt ihr bitte auf eurem Blog oder in eure Onlinegalerie ein und verlinkt das Posting mit eurer Karte/eurem Projekt in der Liste unten in diesem Post. Der Gewinner wird mit random.org ermittelt.
An der Verlosung teilnehmen könnt ihr bis zum 28.10.2016!
Und hier sind die Inspirationen vom Team:
Bianca

Clarissa Schnipsel

Jay Jay

Kathrin


Nela

Tanja

Read more...
Bianca

Clarissa Schnipsel
Jay Jay
Kathrin


Nela

Tanja

***
Bitte verlinkt eure Karten und Projekte hier:
Aquarellhintergründe - watercolor backgrounds
Samstag, 17. September 2016

Heute dreht sich hier alles um Aquarellhintergründe. Die gefielen mir schon eine ganze Zeit ganz gut und nachdem ich mir einige Anleitungsvideos im www angesehen habe (z.B. von Stempelwiese), habe ich es einfach mal selbst versucht und seitdem schon den ein oder anderen Hintergrund aquarelliert. Es geht auch wirklich gar nicht schwer!
Today it's all about watercolor backgrounds. I loved them since I saw them the first time. After I watched some tutorials in the www (e.g. from Stempelwiese) I just tried it myself and since then I made some backgrounds on my own. It really isn't difficult!

- Aquarellpapier (ich nutze 200g/m² kalt gepresstes Papier)
- wasserlösliche Stempelkissen (z.B. Distress Inks)
- eine Folie
- Wasser (ich nutze einen Pumpsprayer)
- wasser- und hitzebeständige Arbeitsunterlage (z.B. Ranger Craft Sheet)
- Heat Tool
- Küchenkrepp
You need:
- watercolor paper (I'm using 200g/m² cold pressed paper)
- water based ink pads (e.g. Distress inks)
- acetate
- water (I use a pump bottle)
- water and heat resistand underlay
- heat tool
- paper towel

***
And here we go! First you have to wet the water color paper. I spray 3-4 times on the paper...

... und verwische das Wasser mit einem Küchenkrepp über der Fläche.
***
... and wipe the water with a paper towel over the whole paper.
***
... and wipe the water with a paper towel over the whole paper.

Als nächstes benötigt ihr eure Folie (meine ist übrigens aus einem Clear Stamp Set, die pappe ich danach wieder auf die Stempel) und eure Stempelkissen. Für das erste Beispiel habe ich nur eine Farbe verwendet.
***
Now you need the acetate (I use one from a clear stamp set and add it back to that when I finished my background) and your ink pads. I only used one color for this example.
Now you need the acetate (I use one from a clear stamp set and add it back to that when I finished my background) and your ink pads. I only used one color for this example.

Tippt Farbe von eurem Stempelkissen auf die Folie...
***
Tap your color from your ink pad onto the foil...
***
Tap your color from your ink pad onto the foil...

... ich mache das immer ein paar Mal.
***
... I always do that several times.
***
... I always do that several times.

Anschließend sprüht ihr ein wenig Wasser auf die Farbe.
***
After that you spray some water onto the color.
***
After that you spray some water onto the color.

So dass am Ende die ganze aufgetragene Farbe in Tropfen auf der Folie ist.
***
At the end the color has to be drops.
***
At the end the color has to be drops.

Dreht die Folie nun um und legt sie auf euer Aquarellpapier. Drückt die Farbe auf das Papier.
***
Now turn your acetate around and add it to the watercolor paper. Push the color onto the paper.
***
Now turn your acetate around and add it to the watercolor paper. Push the color onto the paper.

Wenn ihr die Folie hochnehmt habt ihr eurer erstes Muster.
***
You'll have your first pattern when you remove the acetate.
***
You'll have your first pattern when you remove the acetate.

Dieses muss jetzt trocknen oder getrocknet werden. Ich nutze dafür ein Heat Tool (deshalb auch die hitzebeständige Arbeitsmatte). Wenn ich nicht gerade nebenbei Fotos knipse nehme ich das Papier in die Hand ;)
***
It has to dry now. I use a heat tool for this step (that's why I need a heat resistand underlay). If I don't take any pictures beside working I have the paper in my left hand while drying it ;)
***
It has to dry now. I use a heat tool for this step (that's why I need a heat resistand underlay). If I don't take any pictures beside working I have the paper in my left hand while drying it ;)

Wie ihr seht bilden sich bereits die ersten tollen Flecken auf dem Papier.
***
You can now see how the first beautiful marks appear.
***
You can now see how the first beautiful marks appear.

Getrocknet sieht es dann so aus.
***
After drying it looks like this.
***
After drying it looks like this.

Auf eurer Folie befinden sich noch restliche Farbtropfen, also einfach die Folie noch einmal auflegen. Und gerne auch noch einmal, da wo euch noch etwas fehlt.
***
There are still some color drops on your acetate so just add the acetate to your paper again.
***
There are still some color drops on your acetate so just add the acetate to your paper again.

Und wieder trocknen!
***
And let the color dry!
And let the color dry!

Jetzt kommen noch die hellen Sprenkler! Dazu sprüht ihr euch Wasser auf die Hand...
***
Now we build the lighten marks! Spray some water on your hand...
***
Now we build the lighten marks! Spray some water on your hand...

... und spritzt dieses auf euren Aquarellhintergrund. Ich mache das meist 2-3 Mal.
***
... and splash it onto your watercolor paper. I do it 2-3 times.
***
... and splash it onto your watercolor paper. I do it 2-3 times.

Mit dem Küchenkrepp nehmt ihr das Wasser wieder auf...
***
Use a paper towel to absorb the water...
***
Use a paper towel to absorb the water...

... und habt am Ende ein noch interessanteres Aquarellmuster!
***
... and in the end you'll get a more beautiful watercolor pattern!
***
... and in the end you'll get a more beautiful watercolor pattern!
Und so habe ich den Hintergrund auf meiner Karte eingesetzt.
***
I made this birthday card using the background.

Natürlich könnt ihr euch mehrere Farben verwenden!
***
Of course you can use more than one color!
Of course you can use more than one color!

Ich fange mit der dunkleren Farbe an. Hier habe ich den Hintergrund bereits getrocknet.
***
***
I always start with the darker color. The background here is already dry.

2. und 3. Lage "Resttropfen" (bereits getrocknet).
***
***
2nd and 3rd layer "rest color drops" (already dried).

Bevor ihr die zweite Farbe auftragt wischt ihr eure Folie einmal kurz sauber. Hier ist im oberen Bereich bereits die zweite Farbe aufgetragen und getrocknet.
***
Before starting witht the second color clean your acetate from the first color. Than start adding the second color and let it dry.
***
Before starting witht the second color clean your acetate from the first color. Than start adding the second color and let it dry.

Nach dem Abwischen der Wasserspritzer ist der zweifarbige Hintergrund fertig.
***
After absorbing the water sprinkles the second background is finished.

After absorbing the water sprinkles the second background is finished.

Ich hoffe ich konnte euch diese tolle Technik heute etwas näherbringen und wünsche euch viel Spaß beim Ausprobieren!
***
I hope you like this wonderful technique! Have fun trying it!
Jay Jay
I hope you like this wonderful technique! Have fun trying it!
Jay Jay
Und hier sind die Aquarellhintergründe vom Team:


Pop-Up Panel Karte - Pop-Up Panel Card
Samstag, 10. September 2016

Hallo liebe Stempler!
Heute zeigen wir Euch, wie Ihr eine Pop Up Paneld Karte machen könnt. Wir sind darüber in diversen Videos im Netz gestoßen und möchten Euch nun auch eine deutsche Version zur Verfügung stellen, in der auch die Maße passend auf unser DinA4 angepasst sind.
***
Hello stampers!
Today we want to share a tutorial for a Pop Up Panel Card. We saw these on several videos online but haven't seen a german version. Here we also transferred the dimension to the german DinA4 size.
Für alle Cameo-Besitzer gibt es auch wieder eine Schneiddatei - zum Download kommt Ihr HIER.
***
For all Cameo users we also created a cutting file again - you'll get directed to the download HERE.
Ihr braucht:
1 Stück Cardstock 21 x 29,2 cm
1 Stück Cardstock 29,6 x 7,4 cm
1 Stück Cardstock 10,8 x 29,6 cm
2 Stück Cardstock 9,9 x 14,2 cm
4 Stück Cardstock 7 x 7 cm
Kleber, Schere, Falzbein, Lineal, Bleistift
***
You'll need:
1 piece of cardstock 21 x 29,2 cm
1 piece of cardstock 29,6 x 7,4 cm
1 piece of cardstock 10,8 x 29,6 cm
2 pieces of cardstock 9,9 x 14,2 cm
4 pieces of cardstock 7 x 7 cm
glue, scissors, bonefolder, ruler, pencil

Nehmt zuerst das Cardstock-Stück von 21 x 29,2 cm und falzt es längs an beiden Seiten bei 5,3 cm.
***
First take the piece of cardstock of 21 x 29,2 cm and score the short side at both ends on 5,3 cm.

Dreht den Cardstock dann um 90° und falzt die lange Seite mittig bei 14,6 cm.
***
Turn the cardstock an score the long side at 14,6 cm.
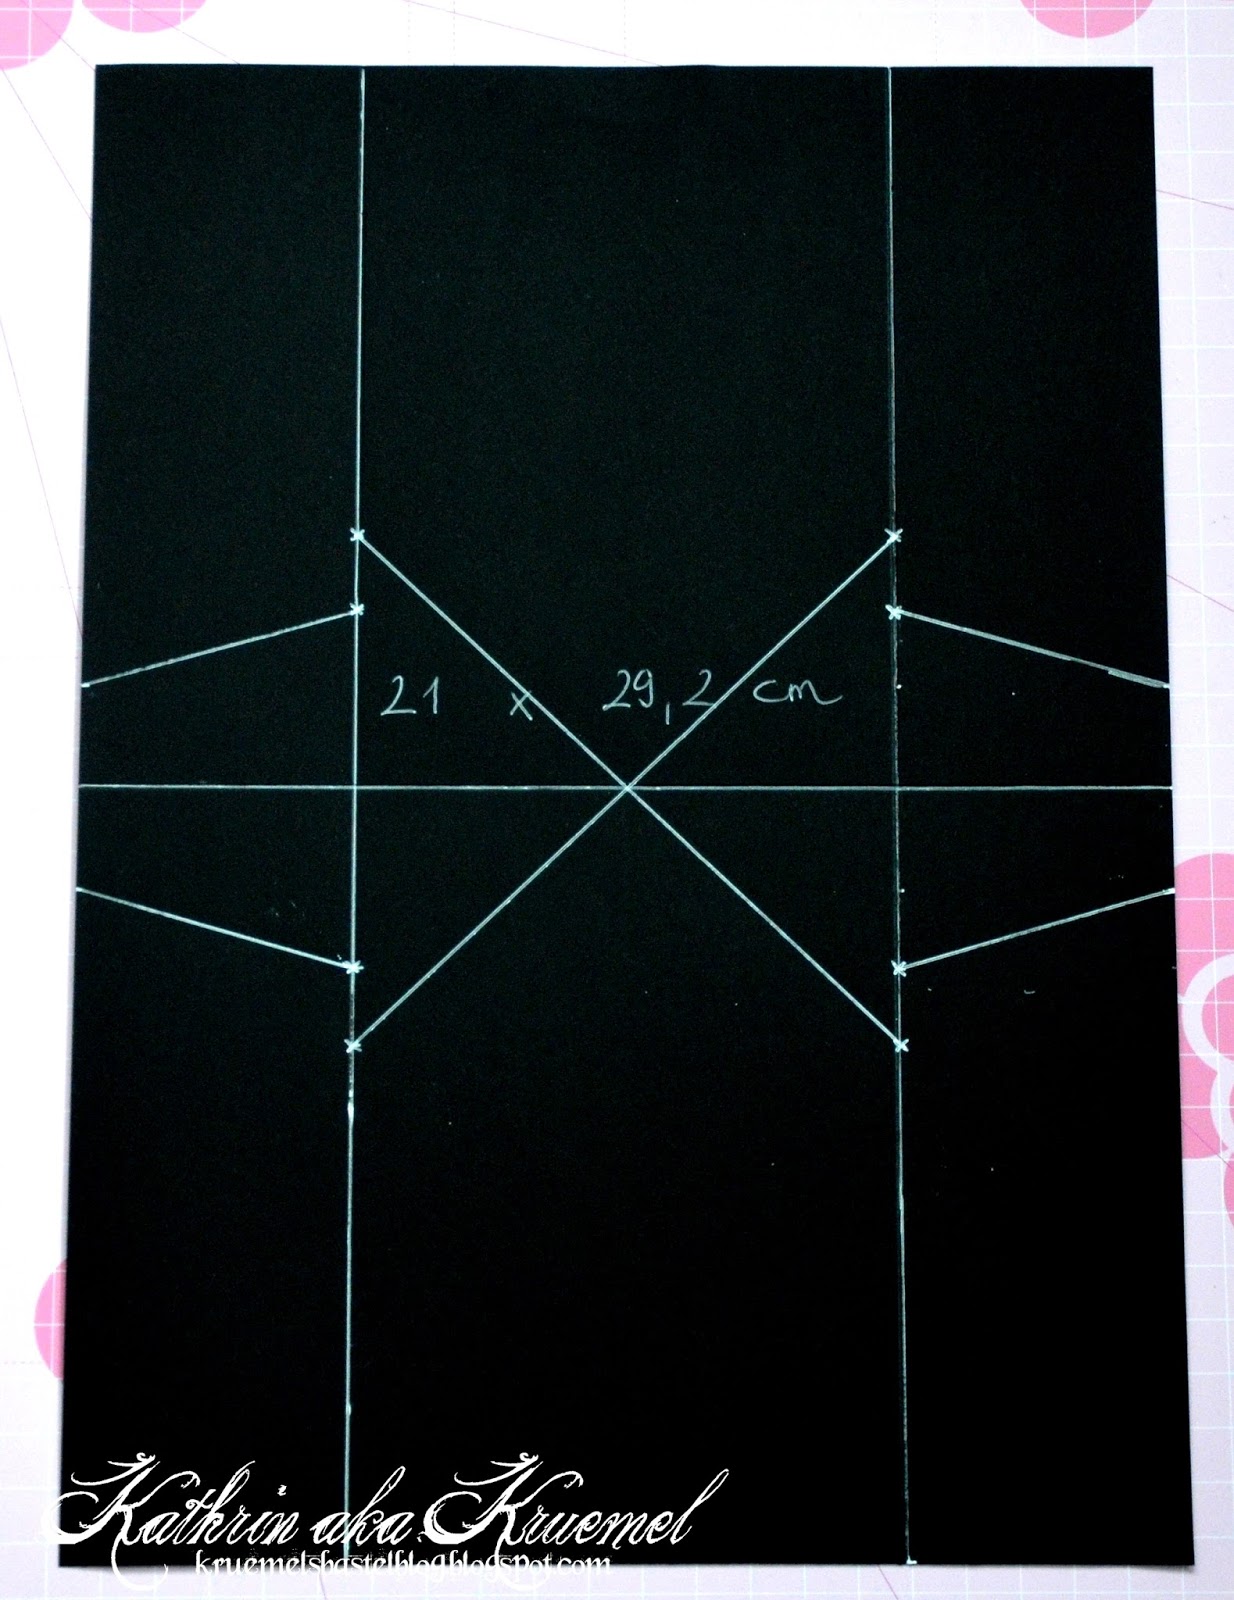
Erschreckt nicht vor dem Bild, das sieht komplizierter aus, als es ist. Aber nun ist Messen und Markieren angesagt.
Legt ein Lineal entlang der 5,3 cm Falz an und messt von der mittleren Falzlinie aus jeweils 3,5 und 5 cm ab. Macht Euch hier jeweils eine kleine Markierung. Am äußeren Rand des Cardstocks messt Ihr jeweils 2 cm ober- und unterhalb der Mittelfalz und macht auch hier eine Markierung. Wiederholt das ganze auf der anderen Seite. Verbindet dann die 2-cm-Markierungen an den äußeren Kanten mit der 3,5-cm-Markierungen. Die 5-cm-Markierung werden jeweils kreuzweise miteinander verbunden, fahrt diese Markierung dann mit dem Falzbein nach. Oben auf dem Bild könnt Ihr das gut erkennen.
***
Don't get scared by the picture, it seems way more complicated as it is. But now we have to do some measuring.
Take a ruler and align it along the 5,3 cm score line. Measure from the middle fold 3,5 and 5 cm to both sides of the score line and make a little mark there. At the outer edge of the cardstock you have to make that mark at 2 cm to the left and right of the middle fold. Repeat these steps on the other 5,3 cm fold. Then draw lines from the 2-cm-marks to the 3,5-cm-marks. The 5-cm-marks get connected to each other crosswise, these also got to be scored with your bonefolder. If you take a look at the picture you'll see it clearly.

Schneidet den Carstock dann wie auf dem Bild zu sehen zu.
***
Then cut the cardstock as shown on the picture.

Nehmt als nächstes den Cardstockstreifen von 29,6 x 7,4 cm und falzt die lange Seite bei 7,4 cm, 14,8 cm und 22,2 cm. Falzt ihn dann ziehharmonikaartig, der mittlere Falz zeigt nach oben.
***
Now take the strip of carstock of 29,6 x 7,4 cm and score the long side at 7,4 cm, 14,8 cm and 22,2 cm. Then fold it, the middle score is a mountain fold.

Für den nächsten Schritt merkt Euch bitte, wo Ihr den Kleber aufbringen müsst. Er kommt jeweils nur auf einen Teil der Seitenlaschen. Die habe ich für Euch mit einem X markiert.
***
For the next step keep in mind where to put the glue - it's only going to half of the side flaps. I made an X there.

Jetzt wird es etwas kniffelig - Ihr müsst hier ganz genau arbeiten, sonst lässt sich die Karte später nicht gut öffnen. Tragt also Kleber auf einen der mit X markierten Teile auf einer der Seitenlaschen auf. Klebt dort mittig dann das erste Quadrat des Carstockstreifens auf. Die Falzlinien müssen hier genau aufeinander liegen.
***
Know it's getting a little tricky - you have to work exactly or your card won't open right afterwards. So, put glue on one of the side flaps where there is an X and glue down there the first square on the strip of cardstock. The score lines need to be exactly on top of each other.

Hier noch ein weiteres Bild des vorherigen Schrittes, das rechte Quadrat ist hier noch nicht festgeklebt. Das tut Ihr als nächstes.
***
Here's another picture of the last step, the right square isn't glued down yet. That's what you'll do now.

Die beiden Cardstock-Stücke von 9,9 x 14,2 cm werden nun an der langen Seite rechts und links bei 9,2 cm markiert. An der kurzen Seite macht Ihr eine Markierung in der Mitte. Verbindet dann die seitlichen Markierungen mit der in der Mitte und schneidet die beiden Ecken ab. Ihr habt dann zwei "Häuser".
***
The two pieces of cardstock of 9,9 x 14,2 cm get marked on both long sides at 9,2 cm. The short side gets marked in the middle. Then draw lines from the side marks to the middle mark and cut off the corners so you'll get a house shaped piece of cardstock.

Klebt die 4 Cardstock-Stücke von 7 x7 cm auf die einzelnen Bereich des Cardstockstreifens...
***
Glue the 4 pieces of cardstock measuring 7 x 7 cm on the cardstock strip you adhered before...

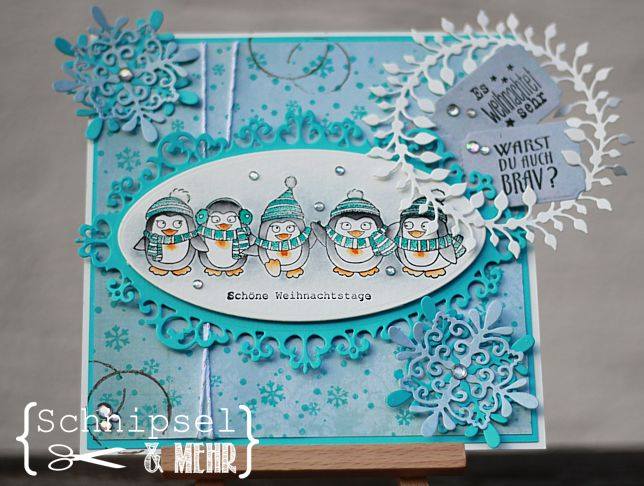
... und klebt die hausförmigen Cardstockteile auf die obere und untere Lasche. Und nun kann es ans Dekorieren gehen! Zum Schluss kann Eure Karte dann so aussehen:
***
...and glue the house shaped pieces of cardstock on the other sides of the card. Now it's time to decorate your card. And this is what it could look like:


***
When glueing down decorations to the inside of our card make sure that the cardstock strip can still turn and fold without getting stopped by the embellishments. The googly eyes I gave my spider are a bit in the way...
Habt viel Spaß beim Nachbasteln!
***
Enjoy making your own pop up panel card!
Eure Kathrin
Und hier sind noch die Karten vom Rest des Teams:
***
And these are the cards the rest of the team made:


Abonnieren
Posts (Atom)