


Nussini-Karte - auch für andere Süßigkeiten
Samstag, 1. Oktober 2011
Wunderschönen Samstag, Ihr Lieben!
***
Happy saturday dear ones!
***
Happy saturday dear ones!
Heute ist der erste Oktober - oh Gott, wo ist die Zeit hin? Meinen Kindern hingegen kann die Zeit nicht schnell genug gehen, denn wir haben ihnen eine Halloween-Party versprochen. Natürlich soll auch gebastelt werden - mit und für die Kinder. Und darum gibt es heute eine Anleitung für eine "Nussini-Karte", die auch für andere Süßigkeiten geeignet ist. Aber Nussini passt farblich so schön... :)
***
It's the 2st of october today - omg, where does the time go? If you ask my kids time can't fly fast enough at the moment because we promised them another Halloween party. Of course they want to do some crafting to - with and for the kids. So today I am sharing a tutorial for how to make a Nussini-card. Nussini is a chocolat candy bar but this card will fir for any other flat candy as well - it's just that Nussini fits those Halloween colors perfectly... :)

Die Karte ist eine Abwandlung der Teelichter-Karte, also ursprünglich nicht meine eigene Idee.
***
This card is a variation of the tealight card so originally it's not my own idea.
This card is a variation of the tealight card so originally it's not my own idea.
Ihr braucht:
Cardstock, 12" breit
evtl. zweiten Cardstock zum Matten
Falzbein
Lineal
Kleber
Schere/Cutter
Nussini (oder eine andere, flache Süßigkeit - auch lose Süßigkeiten wie Smarties passen)
Designpapier
***
You'll need:
cardstock, 12" wide
2nd color of cardstock for matting - if you want to
bone folder
ruler
glue
scissors/cutter
Nussini (or other flat candy bar - also loose candies will fit)
patterned paper

Als erstes müsst Ihr Eure Süßigkeit ausmessen, denn davon hängt die Größe Eurer Karte ab. In der Breite nehmt Ihr am besten einen kompletten 12"-Bogen. Für die Höhe müsst Ihr nach dieser Formel rechnen:
Länge der Süßigkeit + 2 x Höhe der Süßigkeit + 2,8 cm (für die Lasche).
Bitte messt die Süßigkeit etwas großzügig, damit sie auch gut in das Fach hineinpasst.
***
First you have to measure your candy bar because that's what the height of your card will depend on. Best use a complete 12" sheet of cardstock in width. For the height you have to follow this formula:
length of candy + 2 x height of candy + 2,8 cm (for the flap to close the box).
Make sure you don't squeeze the candy while measuring or the candy won't fit in the box.
Ich habe ein Nussini verwendet - es ist ca. 14,7 cm lang, 3,3 cm breit und 1,2 cm hoch. Zu diesen Maßen habe ich je 0,5 cm hinzugerechnet, damit der Schokoriegel anschließend gut in das Fach passt. Ich habe daher meinen Cardstock 21,5 cm hoch geschnitten.
***
I went with a Nussini - it's about 14,7 cm long, 3,3 cm wide and 1,2 cm high. I added 0,5 cm to these measuring to make the candy fit in the box nicely. So I cut my card/cardstock 21,5 in height.
Nun müsst Ihr die Falzlinien für Eure Karte machen. Parallel zur langen Seite habe ich auf beiden Seiten je bei 1,4 cm (Lasche) und 3,1 cm gefalzt (Lasche + Höhe der Süßigkeit).
***
Now you have to score your card. Along the long side I scored at 1,4 cm (flap) and 3,1 cm (flap and height of candy) on both sides.
Parallel zur kürzeren Seite falzt Ihr bei 1 cm (Klebelasche), 2,7 cm (Klebelasche + Höhe der Süßigkeit), 6,5 cm (Klebelasche + Höhe der Süßigkeit + Breite der Süßigkeit) und 8,2 cm (Klebelasche + Höhe der Süßigkeit + Breite der Süßigkeit + Höhe der Süßigkeit).
Das klingt jetzt ziemlich verwirrend, ist aber eigentlich ganz einfach und während des Bastelns leicht zu verstehen.
***
Along the short side score at 1 cm (flap for glueing), 2,7 cm (flap for glueing + height of candy), 6,5 cm (flap for glueing + height of candy + wideth of candy) and 8,2 cm (flap for glueing + height of candy + wideth of candy + height of candy).
This may sound totally irritating but while you're making your card it's easy to understand.

Schneide anschließend - wie auf dem Bild zu sehen - alle überstehenden Teile ab:
***
Then cut off all the excess parts as it can be seen on the photo:
Messt nun das breite Stück neben der Box und zieht davon die Breite Eurer Süßigkeit (inkl. der Zugabe - verwendet also die Maße, die Ihr auch für die Box benutzt habt), in meinem Fall also 3,8 cm, ab. Die übrig bleibende Länge falzt ihr in der Mitte.
***
Now you have to measure the left over part of cardstock next to the box you just scored. Take off the wideth of your candy (incl. the extra of 0,5 cm - so use the measurings you used while making the box too), for my card 3,8 cm. The then left over part has to be scored in the middle.

In die Karte soll ein kleines Tag oder ein Kärtchen gesteckt werden. Damit dies auch nicht übersehen wird, wird die Ecke des Papieres schräg abgeschnitten. Winkel und Länge sind Eurem persönlichen Geschmack überlassen.
***
I want to add a little tag or card. To avoid that it could be overseen the top corner of the cardstock has to be cut off. It's up to you in which ankle or how big you make this.

In die Oberseite der Box wird nun ein Fenster geschnitten. Die Größe des Fensters ist Euch überlassen und hängt natürlich auch von der Größe der Box ab. Lasst aber nach außen einen Rand von mindestens 0,5 cm stehen, damit die Box stabil ist.
Ich habe anschließend noch etwas Transparentfolie von hinten gegen das Fenster geklebt. Dies ist vor allem dann nötig, wenn Ihr kleine Dinge wie z. B. Smarties in die Box füllen möchtet.
***
I cut a window in the top of the box. The size is up to you but of course it also depends on the size of the box. Make sure to leave at least 0,5 cm to the edges so the box won't get instable.
I also put some transparency on the back of the box to cover the window. You need to do this especially if you want to fill your box with small candies like M&Ms.

Faltet nun die Box und klebt sie mit Hilfe der Klebelasche an der Karte fest.
***
Now fold your box and use the flap to glue it to the card base.
***
Now fold your box and use the flap to glue it to the card base.

Zum Schluss wird die Seite mit der abgeschnittenen Ecke auf das Mittelteil geklappt und nur an den Rändern festgeklebt. Laßt den schräg abgeschnittenen Teil offen! Ich habe hier vorher die Teile noch mit hell-lila farbenen Cardstock gemattet.
***
At the end you have to put over the end of your card that you cut off the edge earlier. Glue it down to your card base - leave the cut off edge open to be able to put the tag in! Before I did this step I used some light purple cardstock to mat these parts.
Nun könnt Ihr die Box füllen und natürlich die Karte dekoriern. Viel Spaß!
***
Now you can fill the box and decorate the card. Have fun!
***
Now you can fill the box and decorate the card. Have fun!
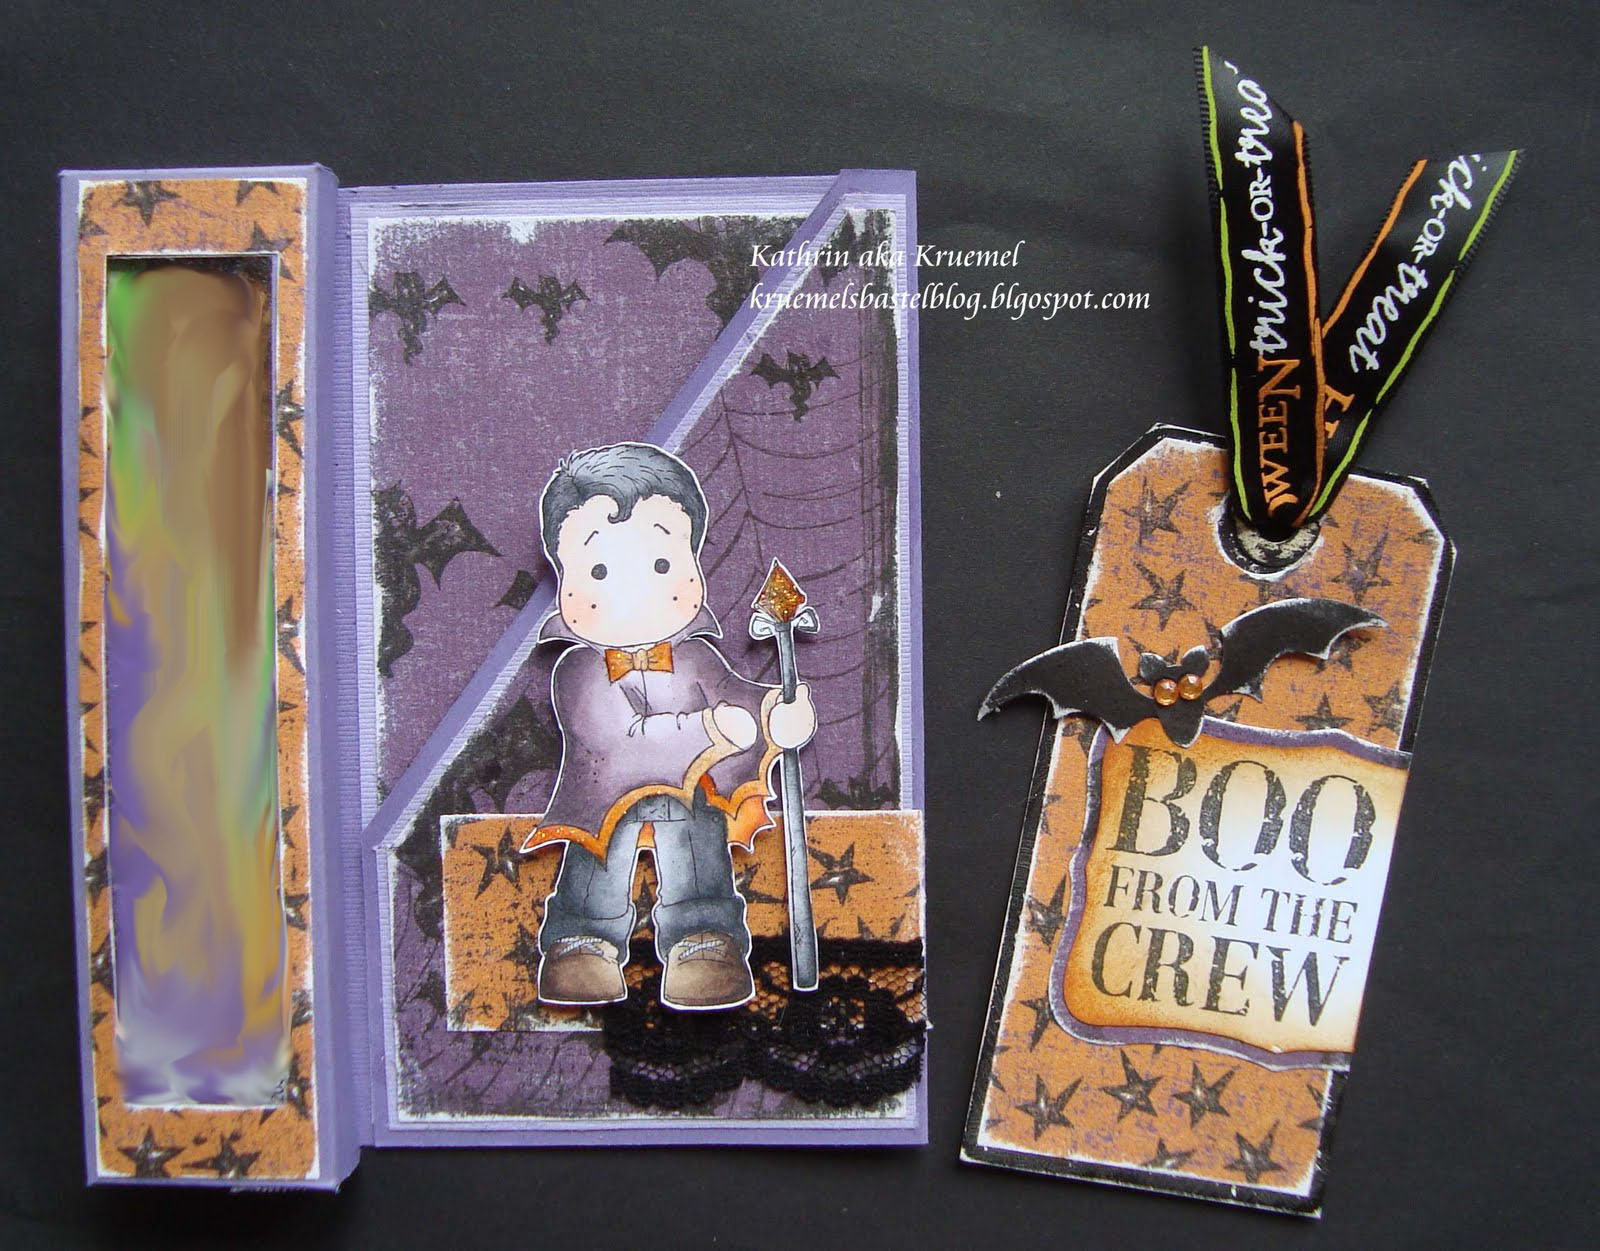
Das ist meine fertige Karte.
***
This is my finished card.
This is my finished card.


Und hier ist noch eine andere Variante als Geburtstagskarte - gefüllt mit einem kleinen Käsekuchen aus dem Kühlregal. Zusätzlich habe ich noch eine Lasche aus einem kleinen Stück Cardstock gedreht und diese seitlich an die Box geklebt. So kann auch noch eine Geburtstagskerze mitgeschickt werden.
***
And here's another version for a birthday - filled with a little cheesecake you can by at the grocery store. I made a little loop from a piece of cardstock and glued it to the side of the box. There you can also add a little birthday candle.
Ich wünsche Euch viel Spaß beim Nacharbeiten!
***
Have fun making your own Nussini-card!

Und hier sind noch die Werke vom Team:
***
And here are the cards the team made:


10 Kommentare:
This is beautiful!!!! I really, want to give it try, but can you please give the exact measurements I have no problem using cm's, I am sure I will find a candy bar here in the states that is the same size as a nussini bar.
Thanks
Debbie
Wow, das ist wieder eine klasse Idee und wunderbare Beíspielkarten.
Das werde ich bestimmt mal ausprobieren.
LG Sabine
Hallo Ihr Super-girls,
das ist ja wieder einmal super schön....
Die Anleitung ist toll beschrieben,also gut nachzuarbeiten und passt auch für andere Süßigkeiten.
Kann man ja für alle Feste,z.b. auch X-MASas,Geburtstag,Ostern usw. durch entsprechend passende Stempelmotive,Papiere und Deko gut umwandeln.
Ich finde es imme eine nette Geste ,wenn "frau" eine Kleinigkeit,zB. als Dankeschön,noch schön verpackt,verschenkt.
Danke Kathrin für die tolle Idee und die Mühe ,die du dir für UNS gemacht hast.
Ein wunder-wunderschönes sonniges Wochenende
Euch ALLEN......
Liebe Grüße
Euere Marion
Ich nochmal,
sorry,..."x-mas" soll es natürlich heißen.
Aber das habt ihr euch wohl schon selber gedacht.
Marion
Wow das ist ja wieder eine super schöne Anleitung,vielen lieben Dank dafür.Die Karten vom Team sind echt klasse,bin ganz begeistert.*schwärm* Nun habe ich schon wieder einen neuen Punkt auf meiner langen ToDo Liste.*hihi*
Liebe Grüße
Angela
Thank you very much for this gorgeous tutorial. I love alls cards that you made.
Francy
Brilliant tutorial with spectacular results. Lee x
Just a quick note to let you know that a link to this post will be placed on CraftCrave today [02 Oct 10:00pm GMT]. Thanks, Maria
Someday I hope to actually make a project and not just admire the stunning work of the design team!! Fantastic tutorial Kathrin.
hiya sweetie
what a super blog
i become a follower right away
what an inspirations
thanks for so many idea's
this one is amazing to
love the creations girls
hugs angelique
Kommentar veröffentlichen