Hallo und herzlich Willkommen bei der neuen Stempeleinmaleins-Ausgabe. Heute habe ich eine Geschenkidee für Euch. Als ich letztens beim Einkaufen war, entdeckte ich Notizzettel, die für einen Stiftehalter-Notizblock gemacht sind. Das heißt, sie sind nur halb so groß wie normale Notizzettel und so kam mir die Idee, eine Easelkarte als Notizzettel-Halter zu machen. Hier ist nun das Ergebnis...
***
Hello and welcome to a new issue of Stempeleinmaleins. Today I have a little idea for a small gift. When I was out shopping recently, I discovered note papers, which are made for a pen holder notepad. So that means, they are only half as large as the regular note papers and so I had the idea to make an Easel Card as Notepad Holder. Now here is the result ...
Was Ihr braucht:
- 1 Stück Cardstock 12 cm x 26 cm
- 1 Stück Cardstock 12 cm x 12 cm
- 1 Stück Cardstock 29,5 cm x 3 cm
- 1 Stück Cardstock 9,3 cm x 5,8 cm
- Schneidemaschine
- Falzbein
- Designpaper
- Notizzettel (meine sind 9 cm x 5,5 cm)
- Kleber, Schere
- und was Ihr sonst noch zum Verzieren braucht
You will need:
1 piece of Cardstock 12 cm x 26 cm
1 piece of Cardstock 12 cm x 12 cm
1 piece of Cardstock 29,5 cm x 3 cm
1 piece of Cardstock 9,3 cm x 5,8 cm
Cutting machine
Bone folder
Designer papers
note papers (mine are 9 cm x 5,5 cm)
glue, scissors
and everything you'll need to decorate
Zuerst falzt Ihr das große Stück Cardstock bei 6 cm, 12 cm und 14 cm.
***
First score the large piece of cardstock at 6 cm, 12 cm and 14 cm.
Jetzt nehmt das lange schmale Stück und falzt es einmal längs in der Mitte und dann bei 4 cm, 10 cm, 19,5 cm und 25,5 cm. Um das ganze falten zu können, müsst Ihr an einer Seite kleine Dreiecke einschneiden. Wenn Ihr eine andere Größe an Zetteln habt, müsst Ihr die Maße natürlich alle entsprechend anpassen.
***
Now take the long thinner piece of cardstock and score it on the long side in middle and than at 4 cm, 10 cm, 19,5 cm and 25,5 cm. You have to cut small triangles to be able to fold it. If you have other papers you'll have to change the measures to fit, of course.
Schneidet an beiden Enden eine Ecke ab
***
Cut the corners on both edges
Wenn Ihr möchtet könnt Ihr das ganze jetzt mit Designpapier verzieren oder auch bestempeln.
***
You can decortate the cardstock with design papers or stamp on it.
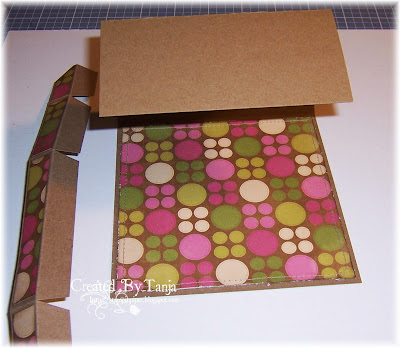
Die Umrandung wird nun auf die untere Seite des großen Cardstock-Stückes aufgeklebt.
***
Adhere the "paper box" to the bottom of your large piece of cardstock.
Klebt das kleine Stück Cardstock hinein und dann müsst Ihr Eure Karte nur noch verzieren.
***
Adhere the small piece cardstock inside this box and decorate your card.
Und das ist mein fertiges Werk:
***
This is my finished project:
Und weil ich gerade dabei war, habe ich noch einen gemacht ...
***
And because I really like this, I made a second one ...
Ich hoffe, Euch gefällt meine Idee und Ihr habt viel Spaß beim Verschenken oder Selbstbehalten :)
***
I hope you'll like my idea and you'll have a lot of fun giving these away or keep it for yourself :)
Eure Tanja


18 Kommentare:
Hallo Tanja!
MIR gefällt Deine Idee!
Danke auch für die Anleitung!
Ich werde sie mal im Hinterkopf behalten und zu gegebener Zeit nachwerkeln.
(Vielleicht als Geb.-Geschenk für eine Arbeitskollegin...?)
Schönes Wochenende!
LG
Das ist ja ein cooles Teil!!! Vielen Dank für die Idee und die tolle Anleitung.
LG Antje
Was für eine schöne Idee und eine tolle Umsetzung.
LG Christina
Sieht super aus und gefällt mir echt gut!!
Liebe Grüße
Martina
Such a cute project. thank you for the inspiration. hugs! MOjca
Tolle Idee und super gestaltet. Vielen Dank für die Anleitung zum Nachwerkeln.
Schönes WE für dich
Renate
Superschöne Idee, danke dafür.
LG Steffi
Hallo,
das ist aber eine wunderschöne Idee,die ich bestimmt einmal nach bastle,liebe Grüße Ulrike
Super - ich bin total begeistert! Ein tolles Geschenk für eine Kollegin. Kleiner Aufwand mit grosser Wirkung. Danke !!!!!
Danke für diese tolle idee!!
Oh, danke für diese schöne Idee! LG Daniela
Thanks for the great idea. Love it!
Hallo,
das sieht wieder richtig schön aus, weiter so!
LG Kerstin
Grazie per il vostro tutorial, è bellissimo!
ho provato a realizzarlo anche io...http://scundy.blogspot.it/2013/05/sticky-notes-da-tavolo.html
Alla prossima,
Claudia
Cool idea! :-) Like it a lot! :-))) Warm greetings from Poland!
superduper Idee. Vielen Dank dafür! Das wird im internen Speicher, sprich meinem Hinterköpfchen abgelegt.
Liebe Grüße Kati
Superbes réalisations, merci pour le tuto très détaillé, si cela vous intéresse j'ai réalisé une carte d'après votre tuto, vous la trouverez ici :
http://scrap-adrigane-athena.over-blog.com/article-carte-chevalet-par-athena-119002353.html
Bises.
Me ha encantado tu pagina es excelente muchas felicitaciones y gracias por compartir tus conocimientos e ideas, desde hoy seré tu fan nro.1
Kommentar veröffentlichen