


Colorieren mit Prismacolor Stiften
Samstag, 8. Mai 2010
Hallo Ihr Lieben,
ich wünsche allen einen wunderschönen Samstag :o) Es ist wieder Wochenende und das heißt es gibt wieder eine neue Ausgabe des Stempeleinmaleins. Diesmal möchte ich Euch zeigen wie man mit Prismacolor Stiften coloriert.
***
Hi dear all,
I wish all of you a wonderful saturday :o) Weekend is finally here and this means a new issue of Stempeleinmaleins is on with another tutorial for you. This time it´s my turn to show you how I color with Prismacolor Pencils.
***
Hi dear all,
I wish all of you a wonderful saturday :o) Weekend is finally here and this means a new issue of Stempeleinmaleins is on with another tutorial for you. This time it´s my turn to show you how I color with Prismacolor Pencils.
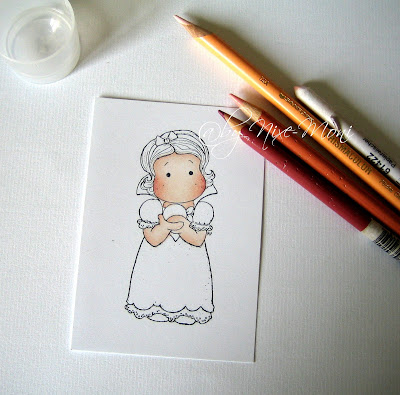
Ich persönlich verwende Prismacolor Premier Stifte von Sandfort/USA. Ihre weichen, wachsbasierten Minen ermöglichen einen sehr satten, intensiven Farbauftrag, aber auch sanfte Übergänge. Prismacolor Buntstifte gibt es aktuell in 132 Farbtönen und einen farblosen Stift, ein sogenannter Blender.
***I´m using Prismacolor Premier Pencils from Sandfort/USA. Their smooth, wax resting mines make a deep and intense paint application possible, but also soft transitions. Current you are getting 132 colored Pencils and one colorless Pencil, which is called blender.
Meine Motive stempel ich mit dem Stempelkissen Versafine Onyx Black auf Karteikarte. Anfänglich habe ich meine Motive auf ganz glattes Papier abgestempelt, aber darauf kam die Farbintensität leider nicht so gut raus und deshalb bin ich davon ganz abgekommen.
***For my images I use the ink pad Versafine Onyx Black and I´m stamping on file cards. At first I stamped my images on slick paper, but the color intensity wasn´t nowhere near as good as on file cards.
Bevor ich mit dem Colorieren beginne, suche ich mir immer erst das Designpapier aus, damit ich das Motiv passend zum Papier colorieren kann.
***Before I start with coloring I´m always looking for the design paper, so that I could color the image suitable to the paper.
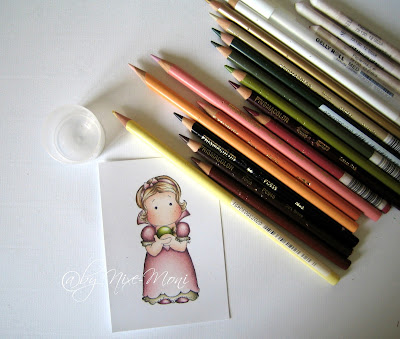
Ihr benötigt folgende Materialien:
- Prismacolor Stifte
- Papierwischer
- Geruchloser Terpentinersatz
- Schmirgelbrettchen (um die Papierwischer zu spitzen)
***
What you need:
- Prismacolor Pencils
- Paper Stump
- White Spirit
- Sandpaper (to sharpen the paper stump)

Und dann kann es auch schon losgehen. Sobald Ihr wisst, welches Motiv Ihr colorieren wollt und das Papier ausgesucht habt, benötigt ihr nur noch die passenden Farbstifte. Das Terpentin dosiere ich mir in einen kleinen Behälter, denn man braucht gar nicht so viel davon.
***
Now, let´s get started. As soon as you know which image you want to color and what paper you like for it, you just need the suitably pencils. I dispense the white spirit in a little container, because you didn´t need so much of it.
***
Now, let´s get started. As soon as you know which image you want to color and what paper you like for it, you just need the suitably pencils. I dispense the white spirit in a little container, because you didn´t need so much of it.
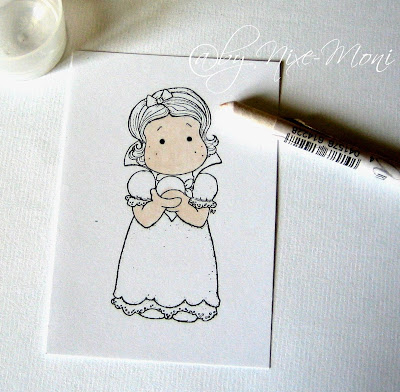
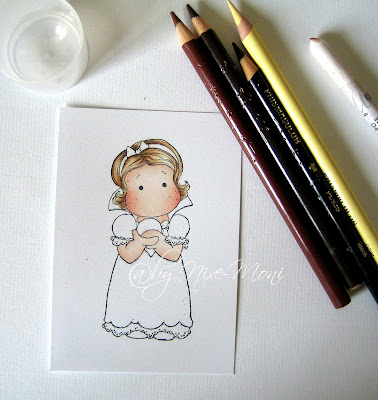
Ich fange immer mit dem Gesicht, den Händen und den Beinen an. Danach sind die Haare dran und zum Schluß beginne ich dann mit der Kleidung, von oben nach unten.
***
I always get started with the face, the hands and the legs. After finishing that, I make the hair and at the end I´m beginning with the clothes, top down.
***
I always get started with the face, the hands and the legs. After finishing that, I make the hair and at the end I´m beginning with the clothes, top down.
Ich male mit der Farbe *Light Peach* das Gesicht und die Arme grob aus.
***
I`m painting the face and the arms with the color *Light Peach*.
***
I`m painting the face and the arms with the color *Light Peach*.
Nun kommt der Papierwischer zum Einsatz, den ich nur ganz leicht in meinen Behälter eintauche, mit ihm vermale ich dann die Farbe.
***
Now I`m dunking the paper stump, just a little bit, into the white spirit and paint in the color.
Es geht nun weiter mit der Farbe *Peach*, mit der ich die Bäckchen und die Stirn vormale, damit ich einen stärkeren Audruck bekomme.
***
Next step I´m using the color *Peach* for the cheeks and the forehead, so that I get a stronger expression.
Next step I´m using the color *Peach* for the cheeks and the forehead, so that I get a stronger expression.

Dann verteile ich mit dem Papierwischer die Farbe ganz vorsichtig und nur ein wenig. Dabei sollte der Papierwischer nicht zu nass sein, weil die Farbe sonst weggewischt wird.
***
Then I distribute the color just a little bit and carefully. Thereby the paper stump should not be to wet, because otherwise the color will be smear.
Das gleiche mache ich jetzt mit der Farbe *Henna*, die ich an den Rand der Bäckchen auftrage, um ihnen noch mehr Ausdruck zu verleihen ...
***
With the color *Henna* I applicate the edge of the cheeks, that give them even more expression ...
... und vermale auch diese Farbe nur ein ganz klein wenig mit dem Papierwischer.
***
... and paint also this color just a little bit, with the paper stump.
... and paint also this color just a little bit, with the paper stump.
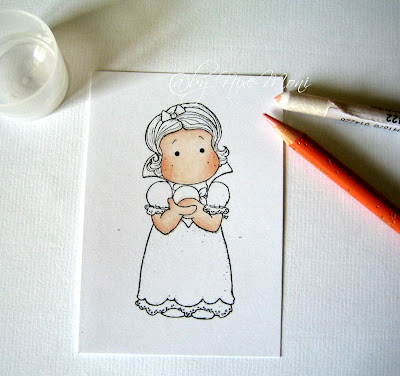
Nun kommen die Haare dran, die ich mit der Farbe *Cream* ein wenig anmale. Danach kommt gleich die Farbe braun hinzu, mit der ich Akzente setzen möchte. Die beiden Farben vermale ich danach ein wenig, damit es weicher aussieht.
***
Now I start to paint the hair with the color *Cream*. I would like to set a course with the colour *Sienna Brown*, which I also paint into the hair. I`m paiting both colors with the paper stump and a little bit white spirit, so that it looks softer.

Nun kommt noch die Farbe *Dark Brown* mit ins Spiel, mit dieser Farbe gebe ich dem Haar noch mehr Ausdruck. Auch hier gehe ich nach dem gleichen Prinzip vor, erst anmalen, dann mit dem Papierwischer die Farbe ein wenig vermalen.
***
Now I used the color *Dark Brown* and with this colour I set again more expression. Also here I made it with the same principle, first painting, then color in with the paper stump.

Zum Schluss betone ich das Haar an bestimmten Stellen noch mit der Farbe *Black* und schon ist das Haar fertig.
***
Finally I accent the hair at certain points with the color *Black* and then the hair is finished.
Finally I accent the hair at certain points with the color *Black* and then the hair is finished.
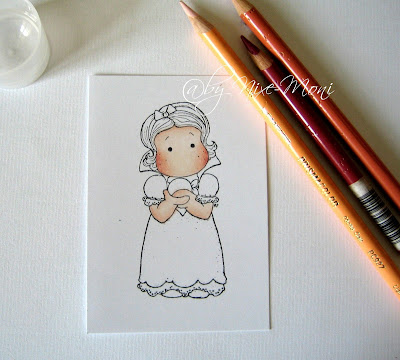
Nun zum Kleid ... Hier male ich mit der Farbe *Pink Rose* die Außenseiten an und spare die Mitte aus. Das gleiche mache ich mit den Ärmeln und dem Kragen des Kleides.
***
Now to the dress ... Therefore I used the color *Pink Rose* and with this color I paint the outsides without the middle. I made the same with the sleeves and the collar of the dress.

Danach gehe ich wieder mit dem Papierwischer über die Farbstellen um sie zur Mitte hin zu verteilen.
***
After that I´m color in again with the paper stump.
After that I´m color in again with the paper stump.
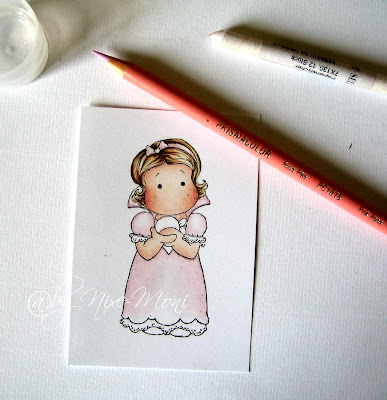
Mit der Farbe *Rosy Beige* mache ich nun genau das gleiche, so wird der Schatten schon etwas intensiver. Wieder mit dem Papiewischer ausmalen und auf zur nächsten Farbe.
***
With the color *Rosy Beige* I set again more expression. Also here I made it with the same principle, first painting, then color in with the paper stump.
Hier habe ich die Farbe *Tuscan Red* an den Rand gemalt um diese danach wieder ganz leicht, zur Mitte hin, mit dem Papiewischer zu verteilen.
***
With the color *Tuscan Red* I paint again the edge and then I color in with the paper stump into the middle.
Das gleich habe ich dann noch einmal wiederholt um mehr Tiefe ins Kleid zu bekommen.
***
I made the same again to get much more deepness into the dress.
I made the same again to get much more deepness into the dress.
Mit der Farbe *Black* kann ich dem Kleid noch mehr Farbtiefe verleihen.
***
With the color *Black* I could give the dress more color depth.
With the color *Black* I could give the dress more color depth.
Da mir die Farbintensität immer noch nicht gefällt, gehe ich ein weiteres mal mit den drei Farben über die Flächen des Kleides, immer von hell auf dunkel.
***
Because the color intensity isn´t still enough, I use the three coloures again and paint over the areas, from bright to dark.
Because the color intensity isn´t still enough, I use the three coloures again and paint over the areas, from bright to dark.

Und natürlich auch wieder mit der Farbe *Black*, erst ein wenig ...
***
And certainly also with the color *Black*, first a little bit ...
And certainly also with the color *Black*, first a little bit ...
... und dann noch einmal, etwas mehr.
***
...and then once again a little more.
Bei dem Unterkleid gehe ich nach dem gleichen Prinzip vor. Erst anmalen, dann mit dem Papierwischer vermalen und auch hier wieder, von hell auf dunkel.
***
Also here I made it with the same principle, first painting, then color in with the paper stump and always from bright to dark.

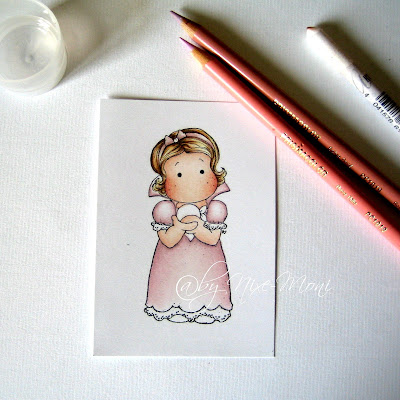
Das gleiche mache ich mit den Schuhen ...
***I made the same with the shoes ...
... und mit dem Apfel.
***and with the apple.

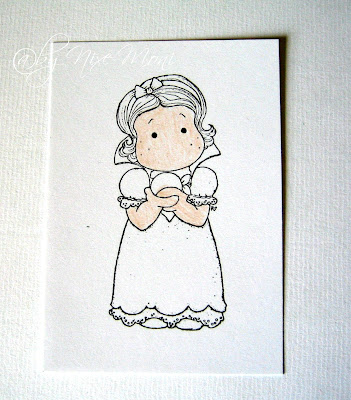
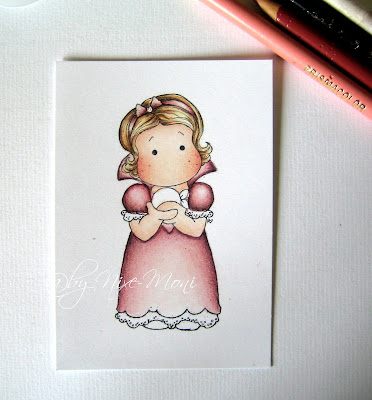
Das Motiv ist nun fast fertig coloriert, es fehlt nur noch der Feinschliff.
***
The image is now almost finished and I´m coming to the final touch.
Ich habe noch ein paar Akzente mit weißem Gelstift und Stickles gesetzt und fertig ist das Motiv. Das Foto habe ich extra dunkel gehalten, damit der Glitzereffekt schön zur Geltung kommt.
***
Finally I set some accents with white gel pen and stickles.
Finally I set some accents with white gel pen and stickles.
Ich hoffe ich konnte Euch ein wenig inspirieren und Euch hat mein kleiner Einblick in die Colorationstechnik mit Prismas gefallen.
Habt ein tolles Wochenende und vielen Dank fürs vorbeischauen.
***
Now I hope you had fun to see behind the curtain, how I color with prismas and I could inspire you a little bit.
Wishing all of you a great weekend and thanks for stopping by.
***
Now I hope you had fun to see behind the curtain, how I color with prismas and I could inspire you a little bit.
Wishing all of you a great weekend and thanks for stopping by.
Hugs
Nixe-Moni 
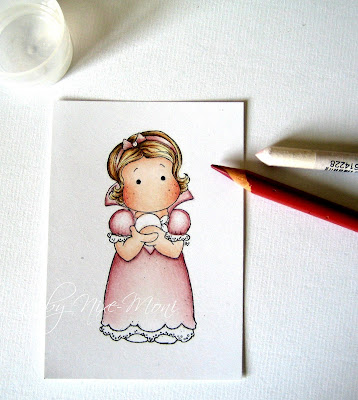
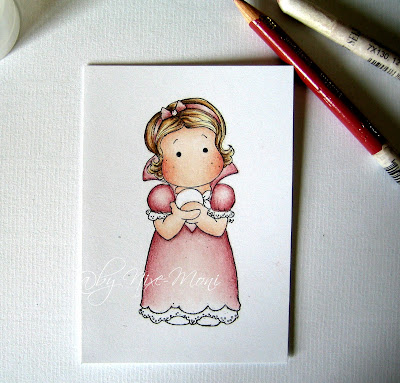
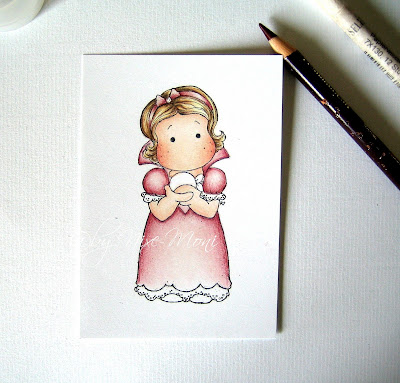
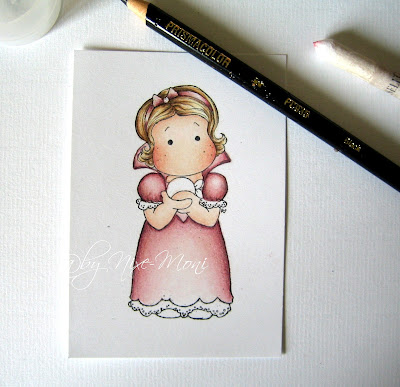
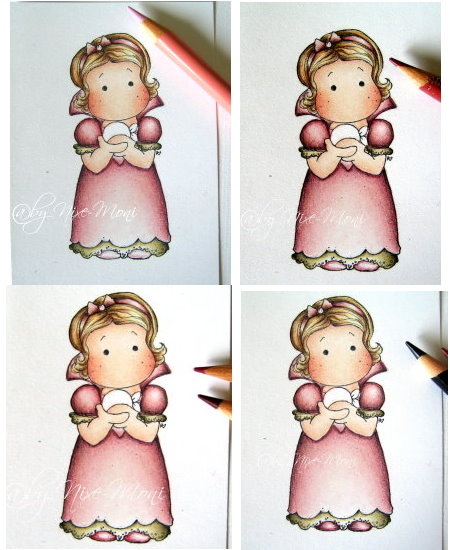
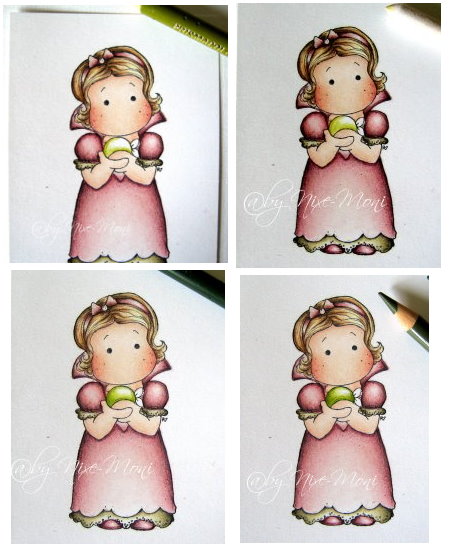
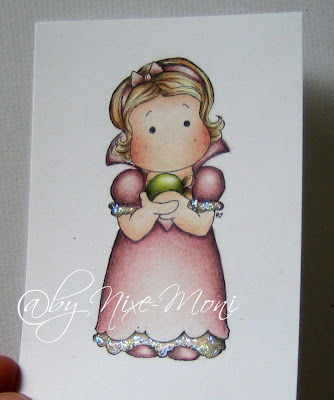
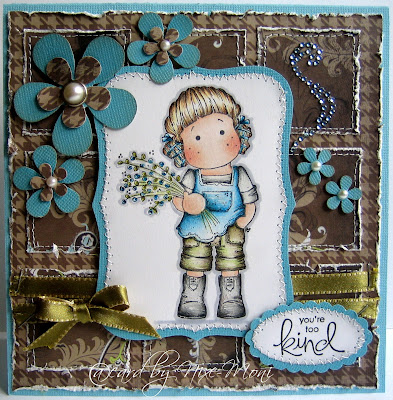
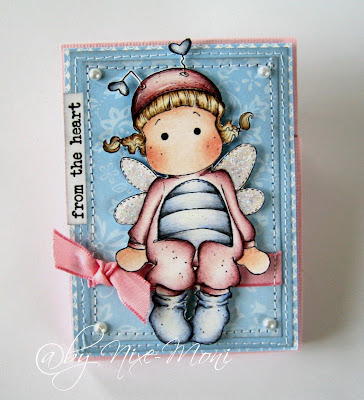
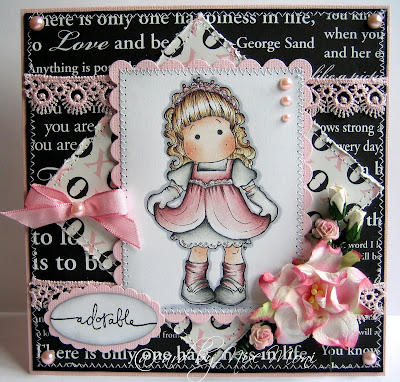
Und hier noch ein paar Beispiele von mir, coloriert mit Prismacolor Stiften:
***
And here are some examples of me, colored with Primacolor Pencils:
And here are some examples of me, colored with Primacolor Pencils:
19 Kommentare:
Oh klasse, nun weiß ich, wie ich noch mehr Tiefe ins Motiv bekomme.
Danke für den tollen WS
Liebe Grüße,
Tanja
Sehr schön!!!
Wow, das sieht wirklich phantastisch aus. Vielen Dank für den Tip mit dem Schwarzen Stift - das ist genial.
LG
Petra
WOW, ich habe mich schon immer gefragt, wie Du Deine Motive colorierst. Ich finde Du hast einen ganz eigenen Stil, der mir sehr gut gefällt und den man selten sieht. Vielen lieben Dank für diese tolle Anleitung!
LG
AndreaM
Hallo Moni,
vielen Dank fuer das tolle tutorial. Jetzt weiss ich auch warum Deine Motive immer so ausserordentlich toll aussehen. Vielen, vielen Dank fuer den Tip den schwarzen Stift zu benutzen.
Hallo Moni,
Bedankt voor je tutorial. Ooit hoop ik zo goed te kunnen kleuren als jij.
Je doet het prachtig!!!
groetjes, Elly
Fabulous tutorial Moni, thank you so much for sharing
hugs Mandy xx
What a fantastic tutorial!
Thanks for sharing!
HUGS,
Hanna
Such a fabulous tutorial Moni. Thanks so much for sharing.
Marion
Moni, das ist ja der Hammer, so bekomme ich das nie auf Karteikarte hin. Ich nehmen immer den Whisper White Cardstock von SU!.
Vielen Dank für die Workshop.
Liebe Grüße, Nadine
ja, ich muß alle hüte ziehen, die ich mein eigen nenne!!! ich bewundere dich für so viel kunst!!
super anleitung. hoffe bekomme das auch mal so hin...lg und danke. bianca
Absolutely stunning colouring, such a fantastic tutorial,thankyou x
Waaaahhhnsinn!!!!! Absolut genial dein Workshop...
Habe Jahrelang darauf gewartet ;-)
Superschön wie du Schicht für Schicht nachfärbst...
So geduldig bin ich nicht, und werde es wohl auch nie werden!
Vielen Dank für den schön bebilderten und super geschriebenen Workshop!
Liebe Grüsse
conni
Your coloring is great! I've tried it several times myself with Colorsoft pencils but it never turns out the way I want it to. Maybe I should give it another shot after seeing your tutorial...
Leonie ~♥~
Wow..your coloring is amazing! Thank you so much for sharing your tutorial! It has really inspired me!
Take care
Hi,
ich habe schon lange eine tolle Anleitung für diese Technik gesucht und bin nun auf diese Seite gestossen. Ich werde es direkt ausprobieren. Die Motive sind soooo klasse ausgemalt.
Vielen Dank für diese super Anleitung.
Liebe Grüße
Fanny
I´m not sure if you received my comment.
I would like to know where i can find the Prismacolors here in Germany.
Thanks for sharing this great tutorial
Liebe Grüße
Maria
Danke für diese Step by Step Anleitung, Da erkennt man super diese Art anorganische Spektroskopie der Farbe und der Entstehung der Schatten...Hat mich auf jeden Fall motiviert es auch noch einmal zu versuchen :)
Kommentar veröffentlichen