Hallo Ihr Lieben und einen schönen Samstag!
Heute möchten wir,
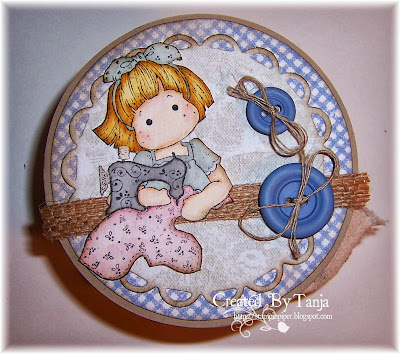
die Schnipselchen euch eine kleine Anleitung für eine Spulen-Aufbewahrung zeigen. Darin lassen sich prima kleine Geschenke wie Bänder, Embellishments und noch viel mehr verschenken.
***
Hello and a happy saturday!
Today we, the Schnipselchen, want to show you a little tutorial for a spoolkeeping. You can use it to give away some gifts like ribbons, embellishments and much more.
Ihr braucht:
- eine leere Graupappe Rolle (z.B. Klebeband/Etiketten/Häkelgarn)
- Fotokarton als Banderole passend für eure Rolle, ich habe für meine Rolle, welche eine Höhe von 10,5 cm und einen Durchmesser von 8 cm hat einen Streifen mit 27,5 x 10,5 cm verwendet.
- 6 Kreise aus Fotokarton ausgestanzt, welche einen größeren DM haben als eure Rolle
- Rest Fotokarton für 2 Kreise, welche dem Innendurchmesser eurer Rolle entsprechen
- 2 Streifen Fotokarton 5 x 27,5 cm
- Kleber
- Scorpal
- Schere
***
You´ll need:
- an empty spool (greyboard from your tape/label/chrochet tread)
- cardstock suitable for your spool for the banderole, for my role with the dimensions 10,5 cm high and an calibre with 8 cm, I´ve used an stripe 27,5 x 10,5 cm.
- 6 circles with an calibre higher than the role
- rest of cardstock for 2 circless suitable for the inside diameter of your role
- 2 stripes cardstock 5 x 27,5 cm
- glue
- scorpal
- scissor
Wenn Ihr euren Fotokarton ebenfalls bestempeln wollt, dann beginnt mit diesem Schritt.
Dazu benötigt ihr den großen Streifen Fotokarton mit 10,5 x 27,5 cm und bestempelt ihn nach Lust und Laune mit eurem Lieblingsstempel. Ich habe hier einen weihnachtlichen Hintergrundstempel verwendet.
***
If you want to stamp your cardstock, make this at first step.
Therefore you´ll need the big cardstock with 10,5 x 27,5 cm, stamp it you way. For my spool I´ve used a christmas background.
Wir beginnen mit Deckel und Boden.
We start with top and bottom.
Den 5 x 27,5 cm Streifen falzt ihr an der Längsseite bei 3 cm
Fold the 5 x 27,5 cm stripe on the length side at 3 cm
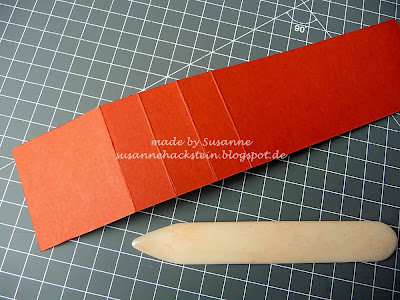
Jetzt falzt ihr beide Streifen und schneidet den 2 cm Streifen ein, wie auf dem Bild zu sehen ist.
Fold both stripes and cut the 2cm stripe like the picture above.
Zieht den Fotokarton nochmal über euer Falzbein, damit er sich dann leichter zu einem Kreis formen lässt.
***
Pull the cardstock over your folding tool, to get later an easier circle shape.
Jetzt zeichnet ihr auf dem Reststück Fotokarton zweimal den Innenkreis eurer Rolle auf und schneidet beide Teile aus.
***
Draw the incircle on your rest cardstock two times and cut them out.
Von den 6 großen Kreisen klebt ihr immer drei Stück aufeinander. Ihr habt nun einen Deckel und einen Boden.
***
Take 3 big circles and set them on top of each other. You have now one top and one bottom.
Jetzt legt ihr einen dieser Streifen mit den Zacken nach aussen in die Rolle und markiert mit einem Bleistift die Klebestelle. Nehmt den Streifen raus und klebt ihn an dieser Markierung zusammen, verfahrt mit dem zweiten Streifen ebenfalls so.
***
Put this stripe in your role and make a mark. It´s your guideline for gluing. Take off the stripe and glue it on this line, do this step with the second one again.
Jetzt bringt ihr zwei Klebebandstreifen auf eure Banderole an und klebt sie fest.
Now bring on two stripes of tape on your banderole and glue it.
Nun wird der geklebte, zackige Kreis wieder in die Rolle gesetzt und mit Kleber versehen. Dreht die Rolle um und platziert sie in der Mitte eures großen Kreise.
***
Put your glued circles in the role again, turn your role and place it in the middle of your big circle.
Wenn das Innenteil nun fest sitzt, zieht ihr die Rolle ab und klebt den kleinen Kreis in den ersten Deckel. Genauso verfahrt ihr nun mit dem zweiten Teil (1x Boden/1x Deckel)
***
If your inner part is stuck, take-off the role and glue the small circle in the cap. Make the same with the second part. (1x top/ 1x bottom)
Fertig, endlich geht's ans dekorieren.
Ready, at last you can start to decorate your spool.
Ich hoffe die kleine Anleitung hat euch gefallen und Ihr habt nun Lust bekommen, selbst so ein Werk zu gestalten.
***
I hope you enjoy this little tutorial and have fun to work with us.
Andrea & Clarissa
Hier seht ihr noch tolle Inspirationen von unserem Design-Team.
Read more...


