Hurra - es ist wieder Samstag = Wochenende; und somit gibt`s eine neue Ausgabe vom Stempeleinmaleins!
Heute hab` ich eine Anleitung für ein kleines, schnelles Kärtchen für Euch aufgeschrieben und fotografiert. Der Name Spring Card hat aber nix mit dem Frühling (= spring) zu tun, sondern damit, dass die Karte quasi "aufspringt".
***
Yippie - it`s Saturday again = weekend; and of course there`s a new issue of Stempeleinmaleins!
Today I put down and took some photos for a tutorial for a quick, little spring card. The name, by the way, has nothing to do with the season, but with the fact, that the card springs open.
Ihr braucht:
Schneide-/Falzwerkzeug, Falzbein, Bleistift, Lineal, Kleber
Cardstock 13 x 26 cm
passendes Design Papier, Embellishments, evtl. Brads,
Stempelmotiv
***
You need:
Cutting/Scoring took, bone folder, pen, ruler, adhesive
a piece of cardstock 13 x 26 cm (5 x 10 ")
matching design paper, embellishments, brads,
stamped image
Hinweis: Die cm- und die Inch-Angaben habe ich nicht 1:1 "übersetzt", sondern so gewählt, dass möglichst gerade Zahlen herauskommen. Die fertige Karte nach cm-Angabe wird daher etwas größer als wenn Ihr sie mit Inch-Angaben fertigt.
***
Tip: I did not transfer the cm- and inch-figures accurately, but adjusted them to be even. Your card will be slightly bigger if you use the cm-figures.
Nun aber los:
Als erstes falzt Ihr den Cardstock über die kurze Seite bei 6,5cm und 13,0 cm. Die Falze gut mit dem Falzbein ausstreichen.
***
Here we go:
At first you score the cardstock over the shorter side at 6,5cm and 13,0 cm (resp. 2,5 and 5"). Crease the folds with the bone folder.
Dreht den Cardstock herum und macht auf der anderen Seite oben und unten bei 19,5 cm eine Markierung. Außerdem markiert Ihr die Mitte der rechten kurzen Seite (bei 6,5cm).
***
Turn the cardstock over and mark it at 19,5cm (7,5"). Besides mark the middle of the righthand short side (at 6,5cm/2,5").
Verbindet nun die 19,5cm Markierungen jeweils mit der unteren bzw. oberen Ecke der ersten Falzlinie. Falzt auch diese Linien und streicht sie mit dem Falzbein gut aus.
***
Connect the marks at 19,5cm (7,5") with the lower resp. upper edge of the first folding line. Fold the lines and crease them well again with the bone folder.
Achtet darauf, dass die horizontalen Falten Talfalten, und die diagonalen Falten Bergfalten sind!
***
Pay attention to the horizontal folds being valley folds, and the diagonal folds being mountain folds!
Verbindet jetzt die beiden 19,5cm Markierungen mit der Mitte der rechten Seite und schneidet die Dreiecke ab.
***
Connect the two 19,5cm (7,5") marks with the middle of the righthand side and cut off the triangles.
Euer Cardstock sollte nun so aussehen:
***
Your cardstock should look like this now:
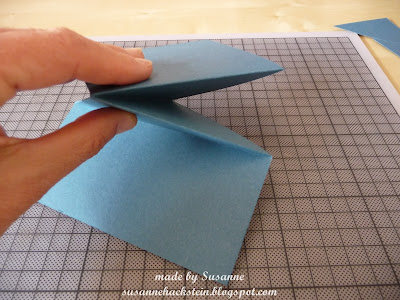
Wenn Ihr alles richtig gefaltet habt, müsste sich die Karte nun fast von allein, wie auf den folgenden Fotos zu sehen, falten lassen:
***
If you made all folds correctly, the card should fold now almost automatically, like you can see on the following pictures:
Nun ist der Rohbau geschafft und Ihr könnt das Kärtchen nach Lust und Laune verzieren! Damit die Karte nicht ganz so doll aufspringt, könnte Ihr wahlweise entweder die Spitze des Quadrats mit etwas Klebstoff fixieren, oder auch an den hinteren Ecken rechts und links mit Brads alles zusammenhalten.
Viel Spaß!
Susanne
***
Now the card base is done and you may embellish your card to your hearts content. To ensure that the card won`t spring open too much you can either put a little adhesive at the tip of the square, or fix the rear edges right and left with brads.
Have fun!
Susanne
Hier mein Beispiel für Euch:
***
Here`s my card for you:
Und ein paar Karten, die vor einiger Zeit entstanden ist:
***
And a few cards I made some time ago:
Und endlich noch die Inspirationen vom DT:
***
And last, but not least, the inspirations of the DT:
 Read more...


