


Secret box
Samstag, 6. April 2013
Der Samstag ist da! Herzlich Willkommen zu einer neuen Ausgabe vom Stempeleinmaleins! Wir haben heute die liebe Norma
(From My Craft Room) aus Kanada wieder als Gast und sie zeigt uns eine ganz tolle Box ...
***
Saturday is here! Welcome to a new issue of Stempeleinmaleins! Today we have the super lovely Norma
(From My Craft Room) from Canada as guest again and she's showing a wonderful box ...
Bevor wir mit dem Workshop beginnen, möchte Norma noch sagen, dass die Idee für diese Box nicht von ihr ist, sondern von Heather Perrauy. Das Tutorial bei den Splitcoaststampers findet Ihr hier für eine 3-inch-Würfel-Box.
***
Before I start on this tutorial, I have to give credit where credit is
due and state that I did not design this box. The credit goes to
Heather Perreaux who created the concept for this box. I found her
tutorial for a 3-inch cube secret box that she has done for
Splitcoaststampers here. She has step-by-step instructions and also a video.

Material:
Für die Box braucht Ihr 5 Stücke Cardstock:
1 in 15,2 cm x 26,6 cm (6" x 10 1/2")
1 in 17,7 cm x 26,6 cm (7" x 10 1/2")
3 in 14,3 cm x 14,3 cm (5 5/8" x 5 5/8")
***
Materials
What you need for the box are 5 pieces of cardstock:
one - 6 inches x 10 1/2 inches (15.2 cm x 26.6 cm)
one - 7 inches x 10 1/2 inches (17.7 cm x 26.6 cm)
three - 5 5/8 inches x 5 5/8 inches (14.3 cm x 14.3 cm)

***
My templates turned out to be quite a bit different than Heather's. Here are the templates for the 4 1/2" high secret box...

rechte Seite der Box/right side of the box
(die feine Linie, die mit dem Pfeil gekennzeichnet ist, zeichnet Ihr fein mit einem Bleistift ein, sie hilft nachher beim Einkleben der Fächer)

linke Seite der Box/left side of the box

Fach/tray
Wenn Ihr richtig gut darin seid, Vorlagen zu verarbeiten, könnt Ihr den Rest ignorieren. Aber wenn Ihr Schritt für Schritt Anleitungen bevorzugt, lest weiter ... Aber es sind viele Fotos!
***
If you have a knack at interpreting templates, then you can ignore the
rest of the posting. However if you need step by step instructions,
then keep on going...LOL. Warning--there are LOTS of pictures!

Schritt 1 - Legt den 15,2 cm x 26,6 cm (6" x 10 1/2") Cardstock auf Euer Falzbrett mit der kurzen Seite oben und markiert den Falz bei 7,6 cm (3").
***
Step 1 - Place the 6" x 10 1/2" cardstock on your scoreboard with the short side along the top and score at 3".
***
Step 1 - Place the 6" x 10 1/2" cardstock on your scoreboard with the short side along the top and score at 3".

Schritt 2 - Dreht den Cardstock, so dass die lange Seite oben ist und falzt bei 7,6 cm und 19 cm (3" und 7 1/2").
***
Step 2 - Rotate the cardstock so the long side is along the top and score at 3" and 7 1/2".

Schritt 3 - An einer Ecke des Cardstock wird diagonal gefalzt, dort wo Ihr auf dem Bild die schwarzen Pfeile seht.
***
Step 3 - At one corner of the cardstock, score diagonally by
lining up the corners (indicated by black arrows below) along one of the
inch grid line on your scoreboard.

Schritt 4 - Im Abstand von 2,5 cm (1") von dieser gefalzten Linie markiert Ihr eine zweite Linie. Dasselbe macht Ihr an der anderen Ecke an der langen Seite des Carstocks, dort wo auf dem Foto der schwarze Pfeil zu sehen ist.
***
Step 4 - Score also at 1" away from the first scoreline. Do the
same scorelines on the other corner of the cardstock at the same long
side of the paper (indicated by the black arrows below).

Schritt 5 - Das kleinere der so entstandenen Dreiecke schneidet Ihr auf beiden Seiten ab.
***
Step 5 - Trim off the small corner triangle. Both corners.

Schritt 6 - Schneidet entlang der horizontalen Falzlinie von der linken vertikalen Falzlinie zur linken Seite des Carstock und von der rechten vertikalen Falzlinie zur rechten Seite des Cardstocks, so wie es auf der Vorlage zu sehen ist.
***
Step 6 - Cut along the horizontal scoreline from the left
vertical scoreline to the left side of the paper, and from the right
vertical scoreline to the right side of the paper. (Refer to
template.)

Schritt 7 - Schneidet diagonal die Ecken, die nicht gefalzt sind, wie unten abgebildet.
***
Step 7 - Cut diagonally at the corners that are unscored as show below.

Schritt 8 - Euer Cardstock sollte nun so aussehen.
***
Step 8 - Your cardstock should look like this now.
***
Step 8 - Your cardstock should look like this now.

Schritt 9 - Faltet Euren Cardstock wie abgebildet
***
Step 9 - Valley fold along the scorelines.

Schritt 10 - Verteilt Kleber auf dem Eckstück wie auf dem Foto zu sehen.
***
Step 10 - Apply glue all over the corner piece that has the flap as shown.
***
Step 10 - Apply glue all over the corner piece that has the flap as shown.

Schritt 11 - Klebt den Cardstock so zusammen, dass sich ein Eckteil ergibt.
***
Step 11 - Tuck the opposite triangle in to form a corner.

Schritt 12 - Klebt das überstehende Stück fest, so dass es eine schöne Kante gibt.
***
Step 12 - Fold the flap up and over.

Schritt 13 - Dasselbe macht Ihr nun mit dem anderen Ende und die eine Seite der Box ist fertig.
***
Step 13 - Do the same to the other end. You now have one side of a box.
***
Step 13 - Do the same to the other end. You now have one side of a box.

Schritt 14 - Legt den 17,7 cm x 26,6 cm Cardstock mit der kurzen Seite oben auf Euer Falzbrett und falzt bei 7,6 cm und 15,2 cm (3" und 6"). Das überstehende Stück von 2,5 cm (1") ist zum Zusammenkleben der beiden Teile gedacht.
***
Step 14 - Place the 7" x 10 1/2" cardstock on your scoreboard with the short side along the top and score at 3" and 6". That extra 1" of paper is for the connecting flap.
***
Step 14 - Place the 7" x 10 1/2" cardstock on your scoreboard with the short side along the top and score at 3" and 6". That extra 1" of paper is for the connecting flap.

Schritt 15 - nun wiederholt Ihr die Schritte 2 bis 7 von dem ersten Teil der Box.
***
Step 15 - With this piece of cardstock do the same Step 2 to Step 7 above.

Schritt 16 - Ein zusätzlicher Schnitt wird bei den Ecken und dem Verbindungsstück gemacht.
***
Step 16 - An extra cut line is required with this cardstock to trim off the corner to form the connecting flap.

Schritt 17 - Euer Cardstock sollte nun so aussehen.
***
Step 17 - This cardstock should look like this now.
***
Step 17 - This cardstock should look like this now.

Schritt 18 - Klebt dieses Teil genauso zusammen wie das andere - Schritte 10 bis 12. Nun habt Ihr den zweiten Teil der Box.
***
Step 18 - Glue the same way as above - Step 10 to Step 12. Now you have the other side of the box.

Schritt 19 -Tragt Kleber auf die Lasche auf, wie oben gezeigt.
***
Step 19 - Apply glue on the connecting flap as show above.

Schritt 20 - Klebt nun beide Teile zusammen.
***
***
Step 20 - Attach the two side together.

Nun habt Ihr Eure Box!
***
And there you have your box!

Schritt 21 - Nehmt nun den 14,3 cm x 14,3 cm Cardstock und legt ihn bei 1,9 cm (3/4") auf Euer Falzbrett. Gefalzt wird bei 5,4 cm und 12,7 cm (2 1/8" und 5").
***
Step 21 - Take your 5 5/8" x 5 5/8" cardstock and place the left edge of the paper along the 3/4" scoreline on the Scor-Pal scoreboard. Score at 2 1/8" and 5".
***
Step 21 - Take your 5 5/8" x 5 5/8" cardstock and place the left edge of the paper along the 3/4" scoreline on the Scor-Pal scoreboard. Score at 2 1/8" and 5".

Schritt 22 - Dreht den Cardstock um 90° und falzt genauso wie vorher.
***
Step 22 - Rotate the cardstock 90 degrees and do the same scoring lines.
***
Step 22 - Rotate the cardstock 90 degrees and do the same scoring lines.

Schritt 23 - Schneidet die Eckteile ein, so wie auf der Vorlage zu sehen.
***
Step 23 - Refer to template and cut along solid lines.

Schritt 24 - Nun werden die Seitenteile gefaltet und mit Klebstoff versehen.
***
Step 24 - Fold along scorelines and apply glue as shown below.
Schritt 25 - Die Seitenteile fügt Ihr zu den einzelnen Fächern zusammen.
***
Step 25 - Attach the sides together to form your tray.
***
Step 25 - Attach the sides together to form your tray.

Schritt 26 - Das untere Fach klebt Ihr nun auf eine Seite der Box (die ohne eingezeichnete Hilfslinie).
***
Step 26 - For placement of the bottom tray inside the box, apply glue as shown below--to 2 sides of the tray and to the bottom of one side of the box.
***
Step 26 - For placement of the bottom tray inside the box, apply glue as shown below--to 2 sides of the tray and to the bottom of one side of the box.

Schritt 27 - Um das obere und das mittlere Fach einzukleben werden 2 Seiten des Faches mit Klebstoff versehen, wie abgebildet.
***
Step 27 - For placement of the top and middle trays, apply glue to 2 sides of each tray as shown below.
***
Step 27 - For placement of the top and middle trays, apply glue to 2 sides of each tray as shown below.


Nun habt Ihr eine fertige Secret Box.
***
And there you have your completed secret box.

Jetzt geht es ans Dekorieren.
***
Now you can decorate your box any way you want.

Das ist die fertige Box!
***
Here's the finished project!
***
Here's the finished project!


***
Hope this tutorial will be of some use to some of you. Happy crafting!!!
Norma
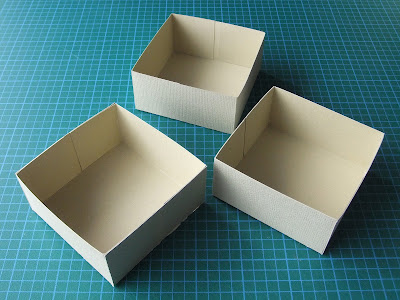
Das sind die Boxen vom Team:
***
***
These are boxes from the Team:


17 Kommentare:
Wow, ja die ist klasse. Ich hab sie schon vor einiger Zeit gemacht und das Ergebnis ist verblüffend.
Schöne Beispiele zeigt ihr!
LG Ingrid
wow wie wunderschön....
das muss man ja gleich an den basteltisch gehen :)
is beutiful, thanks for share the step by step
Greetings from Venzuela
Vielen, vielen Dank für die tolle Anleitung mit den vielen Bildern!!! Die Box steht schon lange auf meiner ToDo-Liste - jetzt traue ich mich sicher bald mal daran....;-)
LG und ein schönes WE
Antje
oooh wow!!! it's great!!! i want to try... thanks for the tutorial! :)
Wow, wie genial ist die denn. Die gefällt mir richtig gut und ist gleich auf meine ToDo-Liste gehüpft.
Danke für den tollen WS.
LG Maren
Das ist ja eine wunderschöne Idee und so eine schöne Anleitung. Danke. LG Maren
Diese Box ist Super- Einzigartig, einfach Toll.
Herzlichst, Brigitte
These are so adorable!!!
Just toooo cute!
Einfach nur wunderschön, wundervoll, superschön und supertoll.....wirklich großartig.
Vielen Dank für die Mühe die du dir gemacht hast um es zu zeigen.
LG Kathrin
Diese Box und eure wunderschönen Umsetzungen haben es mir angetan. Eine schöner als die andere! Und ich habe sie nachgearbeitet. Ich habe mich zwischendrin leicht vermessen, konnte es aber wieder korrigieren.
Vielen Dank für diese Inspiration! Hier meine Umsetzung, falls ihr mal gucken möchtet
http://www.schnipselchen.blogspot.de/2013/04/ne-box.html
LG Sandra
Hallo ihr lieben,
hier meine Umsetzung, habe allerdings meine Cameo zu Hilfe genommen. :-) Tolle Seite, tolle Tutorials, danke.
http://jessikruemel.blogspot.de/2013/04/secret-box.html
Liebe Grüße,
Jessika
Einfach große Klasse eure Arbeiten,diese Box ist ja der Hammer,ich habe schon einige Sachen von euch nachgebastelt und nun habe ich mich als neues Mitglied angemeldet,ich bin begeistert,liebe Grüße Ulrike
WOWI!! Das ist ja eine geniale Box!! Ich habe sie über einen Blog Hop entdeckt!!
Vielen Dank für die tolle
Inspiration,
Elvan :-)
Super Arbeit,werde ich heute noch nachbasteln ist alles so gut erklärt.
Wooo... What a wounderful tutorial, thanks for share.
It is sooo beautiful!!! Thanks for sharing!!! ♡
Kommentar veröffentlichen